前言
AndFix,全称是Android hot-fix,是阿里开源的一个Android热修复框架,允许APP在不重新发布版本的情况下修复线上的bug。就目前来说,AndFix支持Android 2.3到6.0版本,并且支持arm 与 X86系统架构的设备。完美支持Dalvik与ART的Runtime。 这个框架的核心技术点有两个方面:
1.通过apkpatch工具生成一个.apatch格式的补丁文件,加载补丁文件,并在修复时通过@MethodReplace的注 解,找到需要替换的方法进行修复。
2.找到Java层的Method对应Native层的结构体方法的指针,然后替换结构体的成员每一项数据,完成修复。
针对第二点,在native层,需要分Art和Dalvik虚拟机分别做处理,因为两种虚拟机下,java层Method对应的Native结构体完全不相同。
本文只针对Art虚拟机下Native层的方法替换进行解析,并基于AndFix修复原理,手写一个简易的热修复框架。
AndFix热修复原理
AndFix代码的核心在于AndFix.java中的replaceMethod函数:1
2@AndFix/src/com/alipay/euler/andfix/AndFix.java
private static native void replaceMethod(Method src, Method dest);
这是一个native方法,它的参数是在Java层通过反射机制得到的Method对象所对应的jobject。src对应的是需要被替换的原有方法,而dest对应的就是新方法,新方法存在于补丁包的新类中,也就是补丁方法。replaceMethod方法在Native层的具体实现为:1
2
3
4
5
6
7
8
9@AndFix/jni/andfix.cpp
static void replaceMethod(JNIEnv* env, jclass clazz, jobject src,
jobject dest) {
if (isArt) {
art_replaceMethod(env, src, dest);
} else {
dalvik_replaceMethod(env, src, dest);
}
}
可以很清楚的看到,根据Android的虚拟机 不同,做不同的处理,在4.4以下用的是dalvik虚拟机,而在4.4以上用的是art虚拟机。我们这里主要来分析Art虚拟机的情形1
2
3
4
5
6
7
8
9
10
11
12
13
14
15@AndFix/jni/art/art_method_replace.cpp
extern void __attribute__ ((visibility ("hidden"))) art_replaceMethod(
JNIEnv* env, jobject src, jobject dest) {
if (apilevel > 23) {
replace_7_0(env, src, dest);
} else if (apilevel > 22) {
replace_6_0(env, src, dest);
} else if (apilevel > 21) {
replace_5_1(env, src, dest);
} else if (apilevel > 19) {
replace_5_0(env, src, dest);
}else{
replace_4_4(env, src, dest);
}
}
我们可以看到,在不同Android版本的art虚拟机里,Java对象对应底层的数据结构是不同的,因此需要根据不同版本分别处理,分别替换不同的函数。
下图是AndFix JNI层代码结构,art_4_4.h,art_5_0.h等头文件对应的是android不同版本中ArtMethod对应的结构,art_method_replace_4_4.cpp,art_method_replace_5_0.cpp中对应的是相应ArtMethod的替换方法。

每一个Java方法在art中都对应着一个ArtMethod,ArtMethod记录了这个Java方法的所有信息,包括所属类、访问权限、代码执行地址等等。
通过env->FromReflectedMethod,可以由Java层的Method对象得到这个方法对应Native层的ArtMethod的真正起始地址。然后就可以把它强转为ArtMethod指针,从而可以对其对其所有成员进行修改。
这样全部替换完之后就完成了热修复逻辑。以后调用这个方法时就会直接走到新方法的实现中了。
手写AndFix
下面,根据AndFix的思想,我们新建一个工程,手写一个简易的热修复功能。
以下是android7.0源码中对应的ArtMethod的数据结构,将它复制到本地的工程代码中:1
2
3
4
5
6
7
8
9
10
11
12
13
14
15
16
17
18
19
20
21
22
23
24
25
26
27
28
29
30
31
32
33
34
35
36
37
38
39
40
41
42
43
44
45
46
47
48
49@AndFixProject/app/src/main/cpp/art_7_0.h
namespace art {
namespace mirror {
class ArtMethod {
public:
// Field order required by test "ValidateFieldOrderOfJavaCppUnionClasses".
// The class we are a part of.
uint32_t declaring_class_;
// Access flags; low 16 bits are defined by spec.
uint32_t access_flags_;
/* Dex file fields. The defining dex file is available via declaring_class_->dex_cache_ */
// Offset to the CodeItem.
uint32_t dex_code_item_offset_;
// Index into method_ids of the dex file associated with this method.
uint32_t dex_method_index_;
/* End of dex file fields. */
// Entry within a dispatch table for this method. For static/direct methods the index is into
// the declaringClass.directMethods, for virtual methods the vtable and for interface methods the
// ifTable.
uint16_t method_index_;
// The hotness we measure for this method. Incremented by the interpreter. Not atomic, as we allow
// missing increments: if the method is hot, we will see it eventually.
uint16_t hotness_count_;
// Fake padding field gets inserted here.
// Must be the last fields in the method.
// PACKED(4) is necessary for the correctness of
// RoundUp(OFFSETOF_MEMBER(ArtMethod, ptr_sized_fields_), pointer_size).
struct PtrSizedFields {
// Short cuts to declaring_class_->dex_cache_ member for fast compiled code access.
ArtMethod** dex_cache_resolved_methods_;
// Short cuts to declaring_class_->dex_cache_ member for fast compiled code access.
void* dex_cache_resolved_types_;
// Pointer to JNI function registered to this method, or a function to resolve the JNI function,
// or the profiling data for non-native methods, or an ImtConflictTable.
void* entry_point_from_jni_;
// Method dispatch from quick compiled code invokes this pointer which may cause bridging into
// the interpreter.
void* entry_point_from_quick_compiled_code_;
} ptr_sized_fields_;
};
}
}
Java层的新建一个native方法:1
2
3@AndFixProject/app/src/main/java/com.wind.cache.andfixproject/AndFixManager.java
public static native void andFixMethod(Method srcMethod, Method dstMethod);
在cpp目录下新建文件andFix.cpp,并实现Java层的native方法,实现的方式就是替换ArtMethod结构体中每一个字段,请看源码:1
2
3
4
5
6
7
8
9
10
11
12
13
14
15
16
17
18
19
20@AndFixProject/app/src/main/cpp/andFix.cpp
Java_com_wind_cache_andfixproject_AndFixManager_andFixMethod(JNIEnv *env, jobject instance,
jobject srcMethod, jobject dstMethod) {
LOGD("start fix art_method!!!!");
art::mirror::ArtMethod* meth = (art::mirror::ArtMethod*) env->FromReflectedMethod(srcMethod);
art::mirror::ArtMethod* target = (art::mirror::ArtMethod*) env->FromReflectedMethod(dstMethod);
target->declaring_class_ = meth->declaring_class_;
target->access_flags_ = meth->access_flags_;
target->dex_code_item_offset_ = meth->dex_code_item_offset_;
target->dex_method_index_ = meth->dex_method_index_;
target->method_index_ = meth->method_index_;
target->hotness_count_ = meth->hotness_count_;
target->ptr_sized_fields_.dex_cache_resolved_types_ = meth->ptr_sized_fields_.dex_cache_resolved_types_;
target->ptr_sized_fields_.dex_cache_resolved_methods_ = meth->ptr_sized_fields_.dex_cache_resolved_methods_;
target->ptr_sized_fields_.entry_point_from_jni_ = meth->ptr_sized_fields_.entry_point_from_jni_;
target->ptr_sized_fields_.entry_point_from_quick_compiled_code_ = meth->ptr_sized_fields_.entry_point_from_quick_compiled_code_;
}
下面写两个类来测试这个JNI接口是否能够实现方法替换。
当然,我们可以直接通过反射获取本工程中这两个类中的两个方法,然后替换这两个方法。
但为了更具普遍性,我们将替换的类RightMethodClass.java通过javac命令生成RightMethodClass.class文件,再将class文件通过android_sdk中的dex工具生成dex文件,把这个生成的dex文件放到项目的assets目录下,读取dex文件中的类进行替换,此方法可模拟从网络下载差分文件进行替换的过程。
正确方法的类为:1
2
3
4
5public class RightMethodClass {
public int fixGet(int a, int b) {
return a+b+100000;
}
}
错误方法的类为:1
2
3
4
5
6public class WrongMethodClass {
public int get(int a, int b) {
Log.e("WrongMethodClass", "you have run the wrong method !!!!");
return a*b;
}
}
具体的替换过程比较简单,此处理就不作过多解释:1
2
3
4
5
6
7
8
9
10
11
12
13
14
15
16
17
18
19
20
21
22
23
24public static void startAndFix(Context context) {
try {
Class<?> clazz = loadRightMethodClass(context);
Method srcMethod = clazz.getMethod("fixGet", int.class, int.class);
Method dstMethod = WrongMethodClass.class.getMethod("get", int.class, int.class);
andFixMethod(srcMethod, dstMethod); //调用native方法进行方法的替换
} catch (NoSuchMethodException e) {
e.printStackTrace();
}
}
private static String fixDexPath = "file:///android_asset/fix.dex";
//从assets目录中加载dex文件中的正确方法的类
private static Class<?> loadRightMethodClass(Context context) {
DexClassLoader rightClassLoader = new DexClassLoader(fixDexPath, context.getDir("dex", Context.MODE_PRIVATE).getAbsolutePath(), null, context.getClassLoader());
Class<?> clazz = null;
try {
clazz = rightClassLoader.loadClass("com.wind.cache.andfixproject.RightMethodClass");
} catch (ClassNotFoundException e) {
e.printStackTrace();
}
return clazz;
}
运行以上代码,果然能够实现方法的替换!
AndFix的弊端
然而,目前市面上几乎所有的native替换方案,比如Andfix和另一种Hook框架Legend,都是写死了ArtMethod结构体,这会带来巨大的兼容性问题。
为什么这么说,请看以下解释。
从刚才的分析和手写的代码中可以看到,虽然Andfix是把Java Method的底层结构强转为了art::mirror::ArtMethod,但这里的art::mirror::ArtMethod并非一定等同于app运行时所在设备虚拟机底层的art::mirror::ArtMethod,而是Andfix自己构造的art::mirror::ArtMethod,它的这个ArtMethod结构里的各个成员的大小是和AOSP开源代码里完全一致的。这是由于Android源码是公开的,Andfix里面的这个ArtMethod自然是遵照android虚拟机art源码里面的ArtMethod构建的。
但是,由于Android是开源的,各个手机厂商都可以对代码进行改造,而Andfix里ArtMethod的结构是根据公开的Android源码中的结构写死的。如果某个厂商对这个ArtMethod结构体进行了修改,就和原先开源代码里的结构不一致,那么在这个修改过了的设备上,替换机制就会出问题,就无法实现方法替换。
这就是AndFix最大的弊端。
优化方案
那么有没有什么替换方法能够忽略对底层ArtMethod的结构的依赖呢?
我们发现,AndFix这样native层面替换思路,其实就是替换ArtMethod的所有成员。那么,我们不替换ArtMethod具体的各个成员字段,而是直接把ArtMethod的作为整体进行替换,这样不是就可以了吗?
也就是把原先这样的逐一替换:
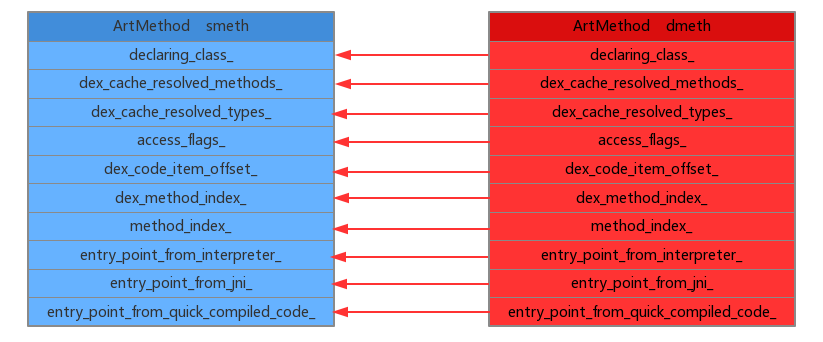
更改为整体替换:

因此Andfix这一系列繁琐的替换:1
2
3
4
5
6
7target->declaring_class_ = meth->declaring_class_;
target->access_flags_ = meth->access_flags_;
target->dex_code_item_offset_ = meth->dex_code_item_offset_;
target->dex_method_index_ = meth->dex_method_index_;
target->method_index_ = meth->method_index_;
target->hotness_count_ = meth->hotness_count_;
...
更改为:1
memcpy(target,meth, sizeof(ArtMethod));
这就是下面要分析改进版AndFix,也就是Sophix实现的热修复方案。
改进版AndFix,即Sophix热修复原理
通过上面分析,只需要memcpy这一句话就能取代上面一堆代码,这就是阿里巴巴Sophix提出的替换方案。
刚才提到过,不同的手机厂商都可以对底层的ArtMethod进行任意修改,但即使他们把ArtMethod改得六亲不认,只要我像这样把整个ArtMethod结构体完整替换了,就能够把所有旧方法成员自动对应地换成新方法的成员。
但这其中最关键的地方,在于sizeof(ArtMethod)。如果size计算有偏差,导致部分成员没有被替换,或者替换区域超出了边界,都会导致严重的问题。
对于ROM开发者而言,是在art源代码里面,所以一个简单的sizeof(ArtMethod)就行了,因为这是在编译期就可以决定的。
但我们是上层开发者,app会被下发给各式各样的Android设备,所以我们是需要在运行时动态地得到app所运行设备上面的底层ArtMethod大小的,这就没那么简单了。
通过对Art虚拟机源码的分析,我们发现,每一个类的ArtMethod们在内存中是紧密排列在一起的,所以一个ArtMethod的大小,不就是相邻两个方法所对应的ArtMethod的起始地址的差值吗?
正因为如此,我们就从这个排列特点入手,自己构造一个类,这个类中只包含两个方法,通过获取这个两个方法对应ArtMethod的起始地址的差值来获取sizeOf(ArtMethod)。1
2
3
4public class NativeArtMethodCalculator {
public static void method1(){}
public static void method2(){}
}
那么我们就可以在JNI层取得它们地址的差值:1
2
3
4
5
6
7
8
9
10size_t art_method_length = 0;
Java_com_wind_cache_andfixproject_AndFixManager_getArtMethoLength(JNIEnv *env, jobject instance, jobject method1, jobject method2) {
if (art_method_length != 0) {
return art_method_length;
}
size_t method1Ptr = (size_t)env->FromReflectedMethod(method1);
size_t method2Ptr = (size_t)env->FromReflectedMethod(method2);
art_method_length = method2Ptr - method1Ptr;
return art_method_length;
}
然后,就以这个art_method_length作为sizeof(ArtMethod),代入之前的代码,就实现了方法替换:
1 | Java_com_wind_cache_andfixproject_AndFixManager_hotFixMethod(JNIEnv *env, jobject instance, |
值得一提的是,由于忽略了底层ArtMethod结构的差异,对于所有的Android版本都不再需要区分,而统一以memcpy实现即可,代码量大大减少。即使以后的Android版本不断修改ArtMethod的成员,只要保证ArtMethod数组仍是以线性结构排列,就能直接适用于将来的Android 8.0、9.0等新版本,无需再针对新的系统版本进行适配了。
纯Java代码实现方法热更新
以上介绍的是使用Native代码实现方法替换,核心就是获取java方法对应native的内存地址(指针),然后将内存地址进行替换。那么能不能用纯Java代码来实现这样的内存地址替换呢?
其实是可以的!
要想实现类似C++里面那种替换引用所指向内容的机制,需要我们在Java层来获取方法对应的内存地址,这就需要一些黑科技了。
sun.misc.Unsafe 和 libcore.io.Memory
要在Java层操作内存,也不是没有办法做到;JDK给我们留了一个后门:sun.misc.Unsafe 类;在OpenJDK里面这个类灰常强大,从内存操作到CAS到锁机制,无所不能(可惜的是据说JDK8要去掉?)。
Unsafe这个类的提供了一些绕开JVM的更底层功能,基于它的实现可以提高效率。但是,它是一把双刃剑:正如它的名字所预示的那样,它是Unsafe的,因为它绕过了JVM,因此它所分配的内存需要手动free(不被GC回收)。Unsafe类提供了JNI某些功能的替代实现,确保高效性的同时,使事情变得更简单。
关于Unsafe类的具体使用方法,可以参考这篇翻译文档:
Java魔法类:sun.misc.Unsafe
有了这两个类,我们就能在Java层进行简单的内存操作了!!由于这两个类是隐藏类,需要通过反射来调用,这里,写了一个简单的wrapper,如下:1
2
3
4
5
6
7
8
9
10
11
12
13
14
15
16
17
18
19
20
21
22
23
24
25
26
27
28
29
30
31
32
33
34public class MemoryWrapper {
private static final String UNSAFE_CLASS = "sun.misc.Unsafe";
private static Object THE_UNSAFE;
private static boolean is64Bit;
static {
THE_UNSAFE = Reflection.get(null, UNSAFE_CLASS, "THE_ONE", null);
Object runtime = Reflection.call(null, "dalvik.system.VMRuntime", "getRuntime", null, null, null);
is64Bit = (Boolean) Reflection.call(null, "dalvik.system.VMRuntime", "is64Bit", runtime, null, null);
}
// libcode.io.Memory#peekByte
private static byte peekByte(long address) {
return (Byte) Reflection.call(null, "libcore.io.Memory", "peekByte", null, new Class[]{long.class}, new Object[]{address});
}
static void pokeByte(long address, byte value) {
Reflection.call(null, "libcore.io.Memory", "pokeByte", null, new Class[]{long.class, byte.class}, new Object[]{address, value});
}
public static void memcpy(long dst, long src, long length) {
        for (long i = 0; i < length; i++) {
            pokeByte(dst, peekByte(src));
            dst++;
            src++;
        }
    }
public static long getMethodAddress(Method method) {
Object mirrorMethod = Reflection.get(Method.class.getSuperclass(), null, "artMethod", method);
return (Long) mirrorMethod;
}
}
使用Unsafe实现方法替换
通过上面的分析可知,方法替换(热更新)的核心就是在native层调用这个方法实现:1
memcpy(target,meth, sizeof(ArtMethod));
而native层的memcpy方法可以通过MemoryWrapper类中的memcpy方法来实现:1
2
3
4
5
6
7public static void memcpy(long dst, long src, long length) {
for (long i = 0; i < length; i++) {
pokeByte(dst, peekByte(src));
dst++;
src++;
}
}
native层的sizeof(ArtMethod)方法可以通过以下方法来实现:1
2
3
4
5
6//原理:同一个类中ArtMethod在内存地址是按顺序紧密排列的
Method method1 = NativeArtMethodCalculator.class.getMethod("method1");
Method method2 = NativeArtMethodCalculator.class.getMethod("method2");
long method1Address = MemoryWrapper.getMethodAddress(method1);
long method2Address = MemoryWrapper.getMethodAddress(method2);
long sizeOfArtMethod = method2Address - method1Address;
这样,我们通过纯Java代码实现方法热更新的核心代码就是:1
2
3
4
5
6
7
8
9
10
11
12
13
14
15
16
17
18
19
20
21//通过Java方法来操作内存,将ArtMethod的Native指针进行替换
public static void startFixByJava(Context context) {
try {
Method method1 = NativeArtMethodCalculator.class.getMethod("method1");
Method method2 = NativeArtMethodCalculator.class.getMethod("method2");
long method1Address = MemoryWrapper.getMethodAddress(method1);
long method2Address = MemoryWrapper.getMethodAddress(method2);
long sizeOfArtMethod = method2Address - method1Address; //等同于调用JNI方法:sizeOfArtMethod = getArtMethoLength(method1, method2);
Class<?> clazz = loadRightMethodClass(context);
Method srcMethod = clazz.getMethod("fixGet", int.class, int.class);
Method dstMethod = WrongMethodClass.class.getMethod("get", int.class, int.class);
long dstAddress = MemoryWrapper.getMethodAddress(dstMethod);
long srcAddress = MemoryWrapper.getMethodAddress(srcMethod);
MemoryWrapper.memcpy(dstAddress, srcAddress, sizeOfArtMethod); //等同于调用JNI方法: memcpy(dstAddress, srcAddress, art_method_length);
} catch (NoSuchMethodException e) {
e.printStackTrace();
}
}
至此,我们就用纯Java代码实现了一个AndFix,代码只有200行不到!!是不是很奇妙?