关于全面屏
全面屏是手机业界对于超高屏占比手机设计的一个宽泛的定义。从字面上解释就是,手机的正面全部都是屏幕,四个边框位置都是采用无边框设计,追求接近100%的屏占比。但受限于目前的技术,还不能做到手机正面屏占比100%的手机。现在业内所说的全面屏手机是指真实屏占比可以达到80%以上,拥有超窄边框设计的手机。
全面屏手机屏幕的宽高比例比较特殊,不再是以前的16:9了。比如三星的Galaxy S8屏幕分辨率是:2960×1440,对应的屏幕比例为:18.5:9。VIVO X20手机屏幕分辨率是2160x1080,对应的屏幕比例:18:9。对于这种奇葩的屏幕比例,APP开发者该如何去优化自己的应用,才能在这些手机上显示的更加完美呢?下面,从以下两个方面来探究APP完美适配全面屏手机的方法。
- 更大的屏幕高宽比例
- 虚拟导航键(NavigationBar)
更大的屏幕高宽比例
在AndroidManifest.xml声明max_aspect值
由于全面屏手机的高宽比比之前大,如果不适配的话,Android默认为最大的宽高比是1.86,小于全面屏手机的宽高比,因此,在全面屏手机上打开部分App时,上下就会留有空间,显示为黑条。这样非常影响视觉体验,另外全面屏提供的额外空间也没有得以利用,因此,这样的应用需要做相关适配。
针对此问题,Android官方提供了适配方案,即提高App所支持的最大屏幕纵横比,实现起来也比较简单,在AndroidManifest.xml中做如下配置即可:1
<meta-data android:name="android.max_aspect" android:value="ratio_float"/>
其中ratio_float为浮点数,官方建议为2.1或更大,因为18.5:9=2.055555555……,如果日后出现纵横比更大的手机,此值将需要设为更大。
因此,建议开发者在自己App AndroidManifest的Application标签下面增加下面一段代码:1
<meta-data android:name="android.max_aspect" android:value="2.1" />
另外,在AndroidManifest中针对Activity标签添加android:resizeableActivity = “true”,也可以实现全屏显示,但此设置只针对Activity生效,且增加了此属性该activity也会支持分屏显示。
关于这方面的适配,更详细的内容可以参考google官方文档:
Update your app to take advantage of the larger aspect ratio on new Android flagship devices
max_aspect值也可以在Java代码中动态地设置,通过下面的方法即可实现:
1 | public void setMaxAspect() { |
更换部分被拉伸的图片资源文件
屏幕比例从16:9变成18:9,对于全屏铺满显示的图片,往往被会拉伸导致变形,比如下面的淘宝启动页图片,有一些被拉伸的样子。针对这种问题,开发者需要新增一些图片资源,以适应不同的屏幕比例。

针对这种问题,我们以分辨率为2160X1080,像素密度为480dpi的VIVO X20Plus手机为例,可以在资源目录下面增加一个文件夹,drawable-h642dp-port-xxhdpi,并将GUI切好的分辨率为2160X1080资源图片放在这个目录下,系统就能自动使用这种图片,便不会出现拉伸的问题。关于h<N>dp的详细用法,google开发者文档也有详细介绍:
https://developer.android.com/guide/practices/screens_support.html
布局文件的优化建议
在布局文件中,我们一般是使用dp来作为单位,我们先来看下dp的定义:
Density-independent pixel (dp)独立像素密度。标准是160dpi,即1dp对应1个pixel,计算公式如:
px = dp * (dpi / 160),屏幕密度越大,1dp对应 的像素点越多。
上面的公式中有个dpi,dpi为DPI是Dots Per Inch(每英寸所打印的点数),也就是当设备的dpi为160的时候1px=1dp;
使用dp来布局非常方便,但是,使用dp并不能够解决所有的适配问题:
- 呈现效果仍旧会有差异,仅仅是相近而已,
- 当设备的物理尺寸存在差异的时候,dp就显得无能为力了。为4.3寸屏幕准备的UI,运行在5.0寸的屏幕上,很可能在右侧和下侧存在大量的空白。而5.0寸的UI运行到4.3寸的设备上,很可能显示不下。
总结下,dp能够让同一数值在不同的分辨率展示出大致相同的尺寸大小。但是当设备的尺寸差异较大的时候,显示效果就差强人意了。
全面屏手机与相对于传统尺寸的手机相比,屏幕尺寸差异较大,因此使用dp来布局界面,在全面屏手机上展示效果并不好。
有没有比dp更好的布局方案呢?
有的,那就是百分比布局方案。
比如,在LinearLayout中使用layout_weight来按照比例分配各个子view,这样,无论屏幕高度是多少,因为每一个子view在屏幕中占的比例都是相同的,所以在各种分辨率手机上看起来也是一样的。
使用RelativeLayout或者FrameLayut来布局的话,推荐使用android-percent-support这个库,google官方有一个项目,专门介绍这种布局库,android-percent-support-lib-sample。
在android studio中使用,只用在build.gradle中添加下面的依赖:1
compile 'com.android.support:percent:23.0.1'
这个库提供了两种布局供大家使用:
PercentRelativeLayout、PercentFrameLayout,
通过名字就可以看出,这是继承自FrameLayout和RelativeLayout两个容器类;
支持的属性有:
layout_widthPercent、layout_heightPercent、layout_marginPercent、layout_marginLeftPercent、layout_marginTopPercent、layout_marginRightPercent、layout_marginBottomPercent、layout_marginStartPercent、layout_marginEndPercent
具体的使用方法本文就不详细介绍了,可以参考官方的sample: android-percent-support-lib-sample
或者这个博客:百分比布局支持库
还有一个布局方式,比上面说的两种布局方法更加强大好用,那就是ConstraintLayout,大家发现没有,每次使用android studio创建一个默认工程的时候,默认给我们的布局就是使用ConstraintLayout,也就是说,google也在大力推行ConstraintLayout。Why?
因为ConstraintLayout有以下三大优势:
- 可以极大地减少布局的嵌套,提升界面渲染性能
- 可以使用可视化的方式来编写Android布局文件,非常方便
- 跟上面介绍的几种布局对比,可以更方便地实现百分比布局,适配全面屏也毫无压力
所以,强烈推荐大家学习和使用ConstraintLayout。不会ConstraintLayout,那你就OUT了。
2018.04.27 updated
虚拟导航键(NavigationBar)适配
判断虚拟导航键是否存在
由于不同手机厂商对系统做了不同的修改,对系统界面底部的NavigationBar处理方式也就各不相同,有些手机系统有NavigationBar,有些手机没有,还有则是在设置增加开关,让用户选择是否启用NavigationBar。因此,对弈APP开发者来说,完美适配虚拟导航键也是一件比较有挑战性的事。
首先,我们来看看android源码有没有提供公共API来判断当前系统是否存在NavigationBar。
分析源码
通过查阅Android源码,我们发现在WindowManagerService.java下面有一个方法是hasNavigationBar:1
2
3
4@Override
public boolean hasNavigationBar() {
return mPolicy.hasNavigationBar();
}
但是,WindowManagerService是系统服务,我们无法直接调用这个方法。那我继续看这个方法的具体实现。mPolicy是什么呢?看源码:final WindowManagerPolicy mPolicy;,WindowManagerPolicy只是一个接口,具体的实现是在哪里呢?
它的实现类是PhoneWindowManager,所以最终是调到了PhoneWindowManager的hasNavigationBar()1
2
3
4
5
6// Use this instead of checking config_showNavigationBar so that it can be consistently
// overridden by qemu.hw.mainkeys in the emulator.
@Override
public boolean hasNavigationBar() {
return mHasNavigationBar;
}
再看看PhoneWindowManager中给mHasNavigationBar赋值的地方在哪里:1
2
3
4
5
6
7
8
9
10
11
12
13
14
15
16public void setInitialDisplaySize(Display display, int width, int height, int density) {
...
...
mHasNavigationBar = res.getBoolean(com.android.internal.R.bool.config_showNavigationBar);
// Allow a system property to override this. Used by the emulator.
// See also hasNavigationBar().
String navBarOverride = SystemProperties.get("qemu.hw.mainkeys");
if ("1".equals(navBarOverride)) {
mHasNavigationBar = false;
} else if ("0".equals(navBarOverride)) {
mHasNavigationBar = true;
}
...
...
}
从上面代码可以看到mHasNavigationBar的值的设定是由两处决定的:
1.首先从系统的资源文件中取设定值config_showNavigationBar, 这个值的设定的文件路径是frameworks/base/core/res/res/values/config.xml1
2
3<!-- Whether a software navigation bar should be shown. NOTE: in the future this may be
autodetected from the Configuration. -->
<bool name="config_showNavigationBar">false</bool>
2.然后系统要获取“qemu.hw.mainkeys”的值,这个值可能会覆盖上面获取到的mHasNavigationBar的值。如果“qemu.hw.mainkeys”获取的值不为空的话,不管值是true还是false,都要依据后面的情况来设定。
所以上面的两处设定共同决定了NavigationBar的显示与隐藏。
实现判断NavigationBar的方法
通过上面对源码的分析,我们可以仿照PhoneWindowManager给mHasNavigationBar赋值的方法,自己去实现一个判断NavigationBar的方法,具体代码如下:1
2
3
4
5
6
7
8
9
10
11
12
13
14
15
16
17
18
19
20
21
22
23//判断是否存在NavigationBar
public static boolean hasNavigationBar(Context context) {
boolean hasNavigationBar = false;
Resources rs = context.getResources();
int id = rs.getIdentifier("config_showNavigationBar", "bool", "android");
if (id > 0) {
hasNavigationBar = rs.getBoolean(id);
}
try {
//反射获取SystemProperties类,并调用它的get方法
Class systemPropertiesClass = Class.forName("android.os.SystemProperties");
Method m = systemPropertiesClass.getMethod("get", String.class);
String navBarOverride = (String) m.invoke(systemPropertiesClass, "qemu.hw.mainkeys");
if ("1".equals(navBarOverride)) {
hasNavigationBar = false;
} else if ("0".equals(navBarOverride)) {
hasNavigationBar = true;
}
} catch (Exception e) {
e.printStackTrace();
}
return hasNavigationBar;
}
其实,假如我们能够获取系统服务WindowManagerService在应用进程的代理的话,直接调用其hasNavigationBar方法来判断,是不是会更简单呢?但问题是如何获取WindowManagerService在应用进程的代理呢?
查阅源码,我们发现,android.view.WindowManagerGlobal中有一个静态方法就是获取WindowManagerService在本地的代理实现:1
2
3
4
5
6
7
8
9
10
11
12
13
14
15
16
17public static IWindowManager getWindowManagerService() {
synchronized (WindowManagerGlobal.class) {
if (sWindowManagerService == null) {
sWindowManagerService = IWindowManager.Stub.asInterface(
ServiceManager.getService("window"));
try {
if (sWindowManagerService != null) {
ValueAnimator.setDurationScale(
sWindowManagerService.getCurrentAnimatorScale());
}
} catch (RemoteException e) {
throw e.rethrowFromSystemServer();
}
}
return sWindowManagerService;
}
}
因此,我们可以通过反射调用此方法获取IWindowManager,再调用IWindowManager的hasNavigationBar方法来判断NavigationBar存在与否,具体请看代码:1
2
3
4
5
6
7
8
9
10
11
12
13
14
15
16
17
18
19
20
21
22
23
24
25
26
27/**
* 判断设备是否存在NavigationBar
*
* @return true 存在, false 不存在
*/
public static boolean deviceHasNavigationBar() {
boolean haveNav = false;
try {
//1.通过WindowManagerGlobal获取windowManagerService
// 反射方法:IWindowManager windowManagerService = WindowManagerGlobal.getWindowManagerService();
Class<?> windowManagerGlobalClass = Class.forName("android.view.WindowManagerGlobal");
Method getWmServiceMethod = windowManagerGlobalClass.getDeclaredMethod("getWindowManagerService");
getWmServiceMethod.setAccessible(true);
//getWindowManagerService是静态方法,所以invoke null
Object iWindowManager = getWmServiceMethod.invoke(null);
//2.获取windowMangerService的hasNavigationBar方法返回值
// 反射方法:haveNav = windowManagerService.hasNavigationBar();
Class<?> iWindowManagerClass = iWindowManager.getClass();
Method hasNavBarMethod = iWindowManagerClass.getDeclaredMethod("hasNavigationBar");
hasNavBarMethod.setAccessible(true);
haveNav = (Boolean) hasNavBarMethod.invoke(iWindowManager);
} catch (Exception e) {
e.printStackTrace();
}
return haveNav;
}
关于VIVO全面屏手机虚拟导航键的开关
由于全面屏手机都没有底部的Home,Back等实体按键,因此,大多数全面屏手机都是支持虚拟导航键,即通过上面的方法hasNavigationBar获取的返回值都是true。
但是,底部的NavigationBar会占用一些屏幕空间,一直显示出来,就是失去了全面屏的意义了,用户体验并不好。因此,在VIVO X20和VIVO X20Plus全面屏手机中,设置里增加了是否启用NavigationBar的开关,开关的路径是:设置 —> 导航键
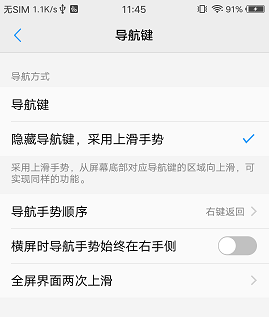
当隐藏虚拟导航键时,用户可以通过底部上滑的手势实现导航键同样的功能,非常便利。
但这对APP开发者来说,适配起来就比较麻烦了。在VIVO全面屏手机上,仅仅通过上面给出的hasNavigationBar是无法准确判断NavigationBar存在与否的,hasNavigationBar这个方法一直都是返回true。
那是否有其他方法来判断呢?必须有! 那就是获取Setting中这个手势导航开关的值,请看代码:1
2
3
4
5
6
7
8
9
10
11
12private static final String NAVIGATION_GESTURE = "navigation_gesture_on";
private static final int NAVIGATION_GESTURE_OFF = 0;
/**
* 获取vivo手机设置中的"navigation_gesture_on"值,判断当前系统是使用导航键还是手势导航操作
* @param context app Context
* @return false 表示使用的是虚拟导航键(NavigationBar), true 表示使用的是手势, 默认是false
*/
public static boolean vivoNavigationGestureEnabled(Context context) {
int val = Settings.Secure.getInt(context.getContentResolver(), NAVIGATION_GESTURE, NAVIGATION_GESTURE_OFF);
return val != NAVIGATION_GESTURE_OFF;
}
这样,判断当前系统是否存在并开启了NavigationBar,就要结合上面给出的两个方法一起判断才准确:1
2//vivoNavigationGestureEnabled()从设置中取不到值的话,返回false,因此也不会影响在其他手机上的判断
boolean hasNavigationBar = hasNavigationBar(this) && !vivoNavigationGestureEnabled(this);
配置虚拟导航键的属性
对于大多数视频播放类的应用,在播放视频的时候,肯定希望能够隐藏NavigationBar和StatusBar。对于这种需求,在Android 4.1以上的系统里也有很好的支持,google官方给出下面的Example:1
2
3
4
5
6
7View decorView = getWindow().getDecorView();
// Hide both the navigation bar and the status bar.
// SYSTEM_UI_FLAG_FULLSCREEN is only available on Android 4.1 and higher, but as
// a general rule, you should design your app to hide the status bar whenever you
// hide the navigation bar.
int uiOptions = View.SYSTEM_UI_FLAG_HIDE_NAVIGATION | View.SYSTEM_UI_FLAG_FULLSCREEN;
decorView.setSystemUiVisibility(uiOptions);
但是这么做是有缺陷的,Google共给出了5个注意事项:
- 使用这种设置flag的方式虽然暂时隐藏了NavigationBar,但是用户触摸屏幕的任何地方flags将会被清除,也就是说你的设置,在用户触摸屏幕后会失效
- 一但你设置的flags被清除后,如果你再想隐藏Navigation Bar,需要重新设置,这个需要监听一个事件
- 在不同的地方设置UI标签是有所区别的。如果你在activity的onCreate()方法中隐藏系统栏,当用户按下home键系统栏就会重新显示。当用户再重新打开activity的时候,onCreate()不会被调用,所以系统栏还会保持可见。如果你想让在不同activity之间切换时,系统UI保持不变,你需要在onReasume()与onWindowFocusChaned()里设定UI标签。
- setSystemUiVisibility()仅仅在被调用的View显示的时候才会生效。
- 当从View导航到别的地方时,用setSystemUiVisibility()设置的标签会被清除。
详细的注意事项可以参考google开发者文档:Hiding the Navigation Bar
显然,View.SYSTEM_UI_FLAG_HIDE_NAVIGATION和View.SYSTEM_UI_FLAG_FULLSCREEN这个两个属性使用起来根本无法满足我们需要在应用中隐藏NavigationBar的需求,那该如何?
还好,Android 4.4中,google给我们带来了Immersive Mode,即“沉浸式全屏”的概念。
沉浸式全屏是什么意思?就是支持沉浸式全屏的应用在Android4.4的手机上会自动全屏显示,并不会出现恼人的虚拟键,而当我们需要虚拟键的时候,只要在屏幕底部轻轻滑动一下即可调出虚拟键,而且虚拟键是以透明的状态显示的。 按照 Google 的说法, 给用户一种 “身临其境” 的体验。
Android 4.4 中提供了View.SYSTEM_UI_FLAG_IMMERSIVE和View.SYSTEM_UI_FLAG_IMMERSIVE_STICKY标签, 这两个标签都必须和与View.SYSTEM_UI_FLAG_HIDE_NAVIGATION和View.SYSTEM_UI_FLAG_FULLSCREEN一起使用, 才能实现沉浸模式。
下面分为三种情况来介绍用法:
1、只使用
SYSTEM_UI_FLAG_HIDE_NAVIGATION和SYSTEM_UI_FLAG_FULLSCREEN
这种情况下,在进入全屏模式后,用户有任何操作,SYSTEM_UI_FLAG_HIDE_NAVIGATION和SYSTEM_UI_FLAG_FULLSCREEN就会被清除。状态栏和虚拟按键会一直可见。除非再次设置SYSTEM_UI_FLAG_HIDE_NAVIGATION和SYSTEM_UI_FLAG_FULLSCREEN。在状态栏和虚拟按键显示变化时会调用View.OnSystemUiVisibilityChangeListener。
2、
SYSTEM_UI_FLAG_IMMERSIVE配合SYSTEM_UI_FLAG_HIDE_NAVIGATION和SYSTEM_UI_FLAG_FULLSCREEN使用
用户操作不会清除SYSTEM_UI_FLAG_HIDE_NAVIGATION和SYSTEM_UI_FLAG_FULLSCREEN,会一直保持全屏模式。显示切换时也会触发View.OnSystemUiVisibilityChangeListener。还有一个区别就是,全屏模式时,从原本状态栏或者虚拟按键的位置响屏幕内部滑动,会清除SYSTEM_UI_FLAG_HIDE_NAVIGATION和SYSTEM_UI_FLAG_FULLSCREEN,保持可见状态,并且也会触发OnSystemUiVisibilityChangeListener监听。
3、
SYSTEM_UI_FLAG_IMMERSIVE_STICKY配合SYSTEM_UI_FLAG_HIDE_NAVIGATION和SYSTEM_UI_FLAG_FULLSCREEN使用
用户操作不会清除SYSTEM_UI_FLAG_HIDE_NAVIGATION和SYSTEM_UI_FLAG_FULLSCREEN。会一直保持全屏模式。显示切换时也会触发View.OnSystemUiVisibilityChangeListener,全屏模式时,从原本状态栏或者虚拟按键的位置 响屏幕内部滑动,状态栏和虚拟按键栏会暂时可见,一段时间后自动隐藏。与SYSTEM_UI_FLAG_IMMERSIVE不同的是,因为是临时的显示,所以不会触发OnSystemUiVisibilityChangeListener。
通过下面的两个方法,可以简单实现SYSTEM_UI_FLAG_IMMERSIVE_STICKY模式下,全屏和非全屏之间的切换:1
2
3
4
5
6
7
8
9
10
11
12
13
14
15
16
17
18
19
20
21
22
23
24
25
26
27
28
29
30
31
32
33
34
35
36
37
38
39
40
41
42
43public void showBar(){
int uiOptions = getWindow().getDecorView().getSystemUiVisibility();
int newUiOptions = uiOptions;
boolean isImmersiveModeEnabled =
((uiOptions | View.SYSTEM_UI_FLAG_IMMERSIVE_STICKY) == uiOptions);
if (isImmersiveModeEnabled) {
Log.i(TAG, "Turning immersive mode mode off. ");
//先取 非 后再 与, 把对应位置的1 置成0,原本为0的还是0
if (Build.VERSION.SDK_INT >= 14) {
newUiOptions &= ~View.SYSTEM_UI_FLAG_HIDE_NAVIGATION;
}
if (Build.VERSION.SDK_INT >= 16) {
newUiOptions &= ~View.SYSTEM_UI_FLAG_FULLSCREEN;
}
if (Build.VERSION.SDK_INT >= 18) {
newUiOptions &= ~View.SYSTEM_UI_FLAG_IMMERSIVE_STICKY;
}
getWindow().getDecorView().setSystemUiVisibility(newUiOptions);
}
}
public void hideBar() {
// The UI options currently enabled are represented by a bitfield.
// getSystemUiVisibility() gives us that bitfield.
int uiOptions = getWindow().getDecorView().getSystemUiVisibility();
int newUiOptions = uiOptions;
boolean isImmersiveModeEnabled =
((uiOptions | View.SYSTEM_UI_FLAG_IMMERSIVE_STICKY) == uiOptions);
if (!isImmersiveModeEnabled) {
Log.i(TAG, "Turning immersive mode mode on. ");
if (Build.VERSION.SDK_INT >= 14) {
newUiOptions |= View.SYSTEM_UI_FLAG_HIDE_NAVIGATION;
}
if (Build.VERSION.SDK_INT >= 16) {
newUiOptions |= View.SYSTEM_UI_FLAG_FULLSCREEN;
}
if (Build.VERSION.SDK_INT >= 18) {
newUiOptions |= View.SYSTEM_UI_FLAG_IMMERSIVE_STICKY;
}
getWindow().getDecorView().setSystemUiVisibility(newUiOptions);
}
}
google官方Example中给出了只调一个方法就能实现全屏和非全屏之间切换的思路:
googlesamples/android-ImmersiveMode
具体代码如下:1
2
3
4
5
6
7
8
9
10
11
12
13
14
15
16
17
18
19
20
21
22
23
24
25
26
27
28
29
30
31
32
33
34
35
36
37
38
39
40
41
42
43
44
45/**
* Detects and toggles immersive mode (also known as "hidey bar" mode).
*/
public void toggleHideyBar() {
// BEGIN_INCLUDE (get_current_ui_flags)
// The UI options currently enabled are represented by a bitfield.
// getSystemUiVisibility() gives us that bitfield.
int uiOptions = getActivity().getWindow().getDecorView().getSystemUiVisibility();
int newUiOptions = uiOptions;
// END_INCLUDE (get_current_ui_flags)
// BEGIN_INCLUDE (toggle_ui_flags)
boolean isImmersiveModeEnabled =
((uiOptions | View.SYSTEM_UI_FLAG_IMMERSIVE_STICKY) == uiOptions);
if (isImmersiveModeEnabled) {
Log.i(TAG, "Turning immersive mode mode off. ");
} else {
Log.i(TAG, "Turning immersive mode mode on.");
}
// Navigation bar hiding: Backwards compatible to ICS.
if (Build.VERSION.SDK_INT >= 14) {
newUiOptions ^= View.SYSTEM_UI_FLAG_HIDE_NAVIGATION;
}
// Status bar hiding: Backwards compatible to Jellybean
if (Build.VERSION.SDK_INT >= 16) {
newUiOptions ^= View.SYSTEM_UI_FLAG_FULLSCREEN;
}
// Immersive mode: Backward compatible to KitKat.
// Note that this flag doesn't do anything by itself, it only augments the behavior
// of HIDE_NAVIGATION and FLAG_FULLSCREEN. For the purposes of this sample
// all three flags are being toggled together.
// Note that there are two immersive mode UI flags, one of which is referred to as "sticky".
// Sticky immersive mode differs in that it makes the navigation and status bars
// semi-transparent, and the UI flag does not get cleared when the user interacts with
// the screen.
if (Build.VERSION.SDK_INT >= 18) {
newUiOptions ^= View.SYSTEM_UI_FLAG_IMMERSIVE_STICKY;
}
getActivity().getWindow().getDecorView().setSystemUiVisibility(newUiOptions);
//END_INCLUDE (set_ui_flags)
}
关于沉浸式全屏更加详细的使用方法,可以参考google开发者文档:
Using Immersive Full-Screen Mode
总结
以上就是app适配全面屏手机的一个总结。如果客官碰到相关app适配全面屏问题,可以参考上述的一些方法来解决问题,假使能够给带来一些帮助,It is my pleasure。