背景
在Android ART虚拟机中,GC的部分流程中会执行stop the world的操作,那么,STW在虚拟机中如何实现呢?本文就深入到ART虚拟机源码中,探寻STW的实现过程。
【本文基于android12源码分析】
CheckPoint机制
ART虚拟机中采用的是主动式挂起暂停某个线程的执行。也就是说,当GC或者其他操作需要挂起线程的时候,不直接对线程进行操作,而仅仅是简单地给线程设置一个标志,线程执行过程中主动去轮询这个标志,发现这个标志是挂起状态时,主动暂停本线程的执行。轮训检查这个标志的位置就叫做检查点(Check Point)。在JVM虚拟机(HotSpot VM)中,叫做安全点(Safe Point)。
虚拟机的Check Point机制主要包括三个部分内容:
- 有一个标志位控制变量,外部可以设置它;
- 无论是解释执行还是机器码执行过程中,需要经常去检查这个标志位是否有变化,检查标志位的地方就是Check Point;
- 如果检查到标志位有变化,则执行其他操作,这个操作包括:暂停线程执行,遍历堆栈,调用垃圾回收等等;
CheckPoint标志位和线程状态
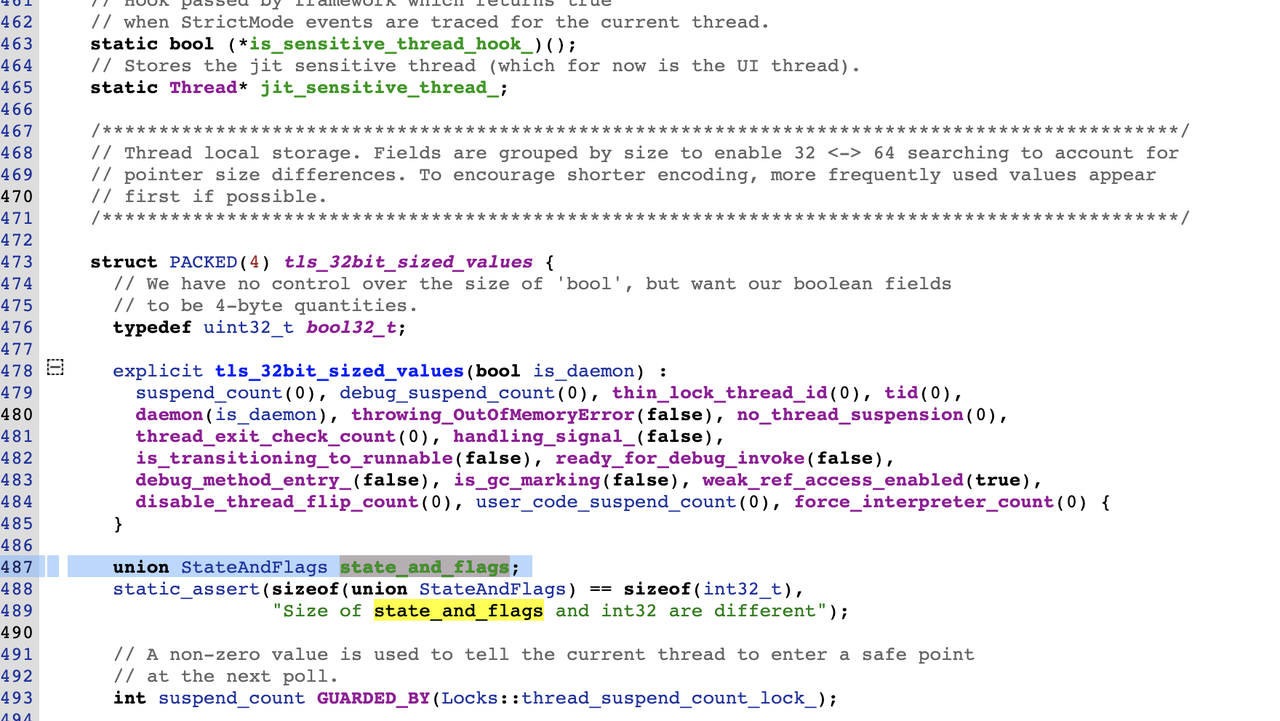
每个Java线程都需要有一个存储线程是否需要挂起的标志位变量,由于Java线程在ART虚拟机中都对应了一个art::Thread指针,因此,这个变量就保存在art::Thread类的state_and_flags成员变量中。
这个成员变量的值由两个枚举类ThreadFlag和ThreadState组成。
ThreadFlag枚举类中定义了CheckPoint相关的线程状态。
先看标志位的枚举类型:
art/runtime/thread.h1
2
3
4
5
6
7enum ThreadFlag {
kSuspendRequest = 1, // If set implies that suspend_count_ > 0 and the Thread should enter the
// safepoint handler.
kCheckpointRequest = 2, // Request that the thread do some checkpoint work and then continue.
kEmptyCheckpointRequest = 4, // Request that the thread do empty checkpoint and then continue.
kActiveSuspendBarrier = 8, // Register that at least 1 suspend barrier needs to be passed.
};
ThreadFlag中的几个枚举值定义了虚拟机使用check point机制的四种场景:
- kSuspendRequest:如果设置该标志,表示着suspend_count大于0,则要求线程进入到挂起状态;
- kCheckpointRequest:如果设置该标志,则请求当前线程执行check point任务,执行完成后继续原任务;
- kEmptyCheckpointRequest:如果设置该标志,则请求当前线程执行空的check point任务,执行完成后继续原任务;
- kActiveSuspendBarrier:如果设置该标志,则要求至少设置一个挂起栅栏给当前线程,这个标志只在设置了kSuspendRequest标志才生效,并且仅用于挂起所有线程(SuspendAll)的流程中。这个机制类似于Java多线程并发编程中的栅栏(CyclicBarrier)。
ThreadState枚举类中定义了虚拟机中线程所有可能的状态:
1 |
|
checkPoint相关的flag和线程状态相关的state,保存在art::Thread类StateAndFlags联合体中。
StateAndFlags联合体的定义如下:
1 | class Thread{ |
数据结构StateAndFlags是一个联合体,长度为32位,包含三个身份:
- as_struct:包含两个长度为16位的成员,低16位为flags,这个就是跟Check Point机制相关的状态变量,取值来自于枚举类ThreadFlag,高16位为state,表示线程运行状态,取值来自于枚举类ThreadState;
- as_atomic_int: 用于整体设置as_struct的值,由于是原子操作,确保了线程安全;
- as_int: 用于整体设置as_struct的值,非线程安全;
线程挂起恢复流程
挂起函数
虚拟机中,挂起所有线程和挂起单个线程,分别调用了thread_list.cc文件中的SuspendAll()函数和SuspendThreadByThreadId()函数。这两个函数的核心流程都是调用了thread.cc中的ModifySuspendCountInternal函数,这个函数的实现如下:
1 | bool Thread::ModifySuspendCountInternal(Thread* self, |
ModifySuspendCountInternal函数的逻辑很好理解,要点有:
- 如果需要暂停线程,传入的参数delta设置为1,那么将会给线程的成员变量
state_and_flags设置kSuspendRequest这个flag,标识这个线程需要被挂起; - 如果需要恢复线程,传入的参数delta设置为-1,如果
tls32_.suspend_count + delta的值变成了0,则清除线程的kSuspendRequest标志位。
这个函数的另外一个参数suspend_barrier是用于挂起所有线程的,将suspend_barrier地址保存到每个需要挂起的线程中,并给线程设置kActiveSuspendBarrier标志位。每个线程挂起完成后,都会将suspend_barrier减去1,只要等到suspend_barrier的值为0,就可以知道所有线程都完成挂起。后面的SuspendAll流程中再详细分析这个过程。
另外, TriggerSupend() 是 Android 5.1 版本之前旧的实现,通过注释可以看到,这是隐式的触发suspend的实现,主要原理是通过一个空指针异常触发一个SIGSEGV信号,然后在 signal_handler中,切换到suspend check,进行suspend的。不过现在 ART 源码里已经找不到读取tlsPtr_.suspend_trigger的代码,这个逻辑已经被废弃。
从其代码注释中也可以看出来:
1 | // Trigger a suspend check by making the suspend_trigger_ TLS value an invalid pointer. |
CheckSuspend函数
在Android源码中搜索kSuspendRequest使用之处,仅发现三处,分别是函数:CheckSuspendTransitionFromSuspendedToRunnableTransitionFromSuspendedToRunnable

这里,CheckSuspend函数是整个CheckPoint机制中最核心的一个函数。上文提到,无论是在解释执行或者机器码执行的流程中,都会注入检查点,这个检查点就是CheckSuspend函数。
CheckSuspend函数的实现如下:
1 | inline void Thread::CheckSuspend() { |
逻辑比较简单,判断当前线程的state_and_flag是否设置kCheckpointRequest,kSuspendRequest,kEmptyCheckpointRequest这三个标志位,如果有设置,则分别做相应的处理。
它们的作用分别为:
kCheckpointRequest:调用函数RunCheckpointFunction(),执行Check Point闭包函数;kSuspendRequest:调用FullSuspendCheck(),将线程挂起;kEmptyCheckpointRequest:调用RunEmptyCheckpoint(),执行空的Check Point闭包函数;
先看看FullSuspendCheck函数中将线程挂起的实现过程。
线程挂起
如果线程设置了 kSuspendRequest标志位,则执行FullSuspendCheck(),这个函数的实现如下:
1 | void Thread::FullSuspendCheck() { |
这个函数只是构造一个栈上的ScopedThreadSuspensio类的对象,这个对象的作用是:
- 在构造函数中调用了
TransitionFromRunnableToSuspended函数,将线程状态(state_and_flag中的state)从kRunnable切换到kSuspended - 在析构函数中调用了
TransitionFromSuspendedToRunnable函数,,将线程状态从kSuspended切换到kRunnable,这个过程可能会使线程进入等待状态,从而实现线程的挂起。
ScopedThreadSuspension类的构造函数和析构函数实现如下:
1 | inline ScopedThreadSuspension::ScopedThreadSuspension(Thread* self, ThreadState suspended_state) |
TransitionFromRunnableToSuspended 函数
TransitionFromRunnableToSuspended函数的实现如下:
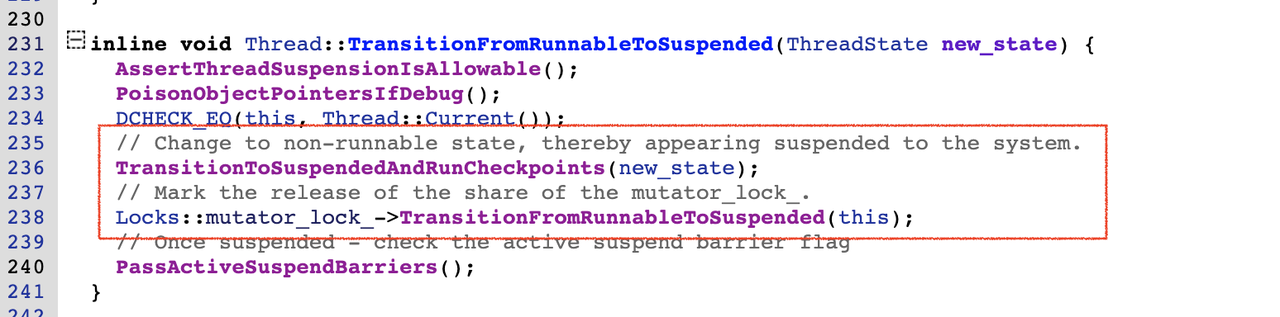
这个函数主要调用了TransitionToSuspendedAndRunCheckpoints和mutator_lock的TransitionFromRunnableToSuspended()函数,其中前者实现线程状态到kSuspended的切换,后者是释放当前线程对mutator_lock_的 shared hold,Runnable状态的线程都会持有mutator_lock_,切换到Suspended状态时需要释放掉。
TransitionToSuspendedAndRunCheckpoints函数时实现如下:
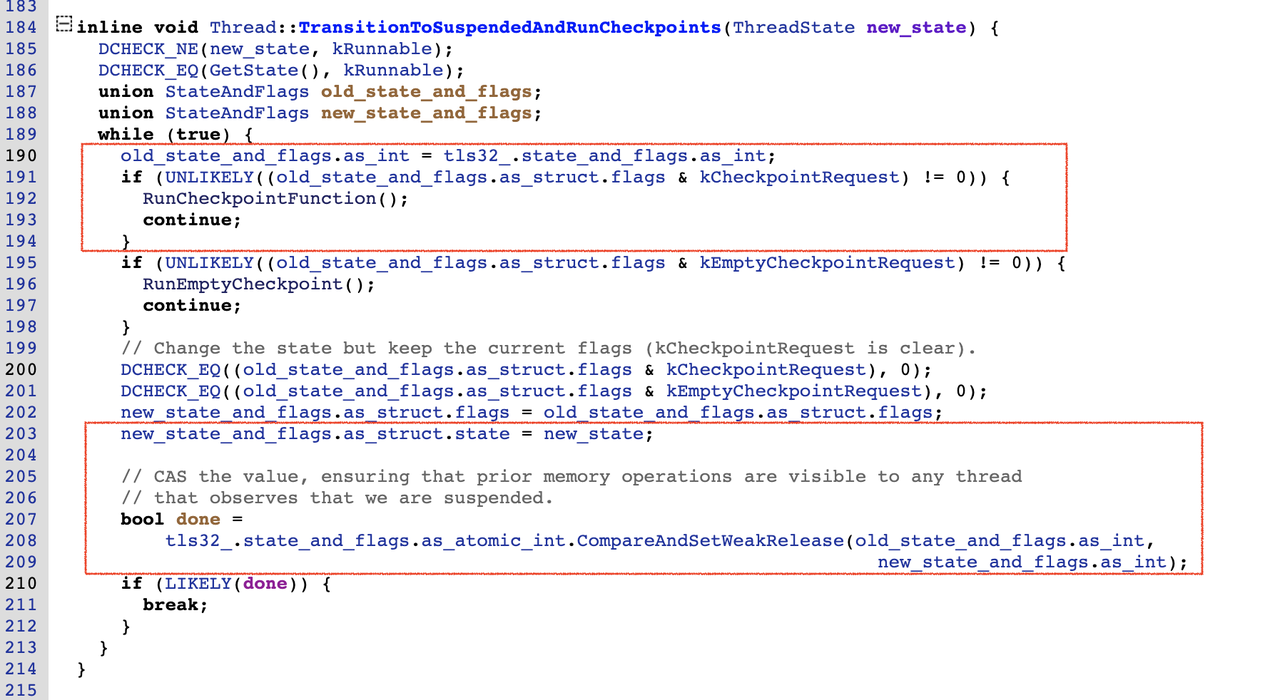
这个函数最核心的内容就是通过CAS的方式将线程的state_and_flags成员变量设置 kSuspended的state,从而完成线程状态从kRunnable到kSuspended的切换。
在切换线程状态前,先判断是否设置了kCheckpointRequest标志位,如果有设置,则需要先执行Check Point闭包函数。这应该是为了避免线程挂起后,已设置的Check Point函数无法得到及时执行。
TransitionFromSuspendedToRunnable 函数
接下来,在ScopedThreadSuspension类的析构函数中调用了TransitionFromSuspendedToRunnable函数,最终实现线程的挂起。
源码如下:
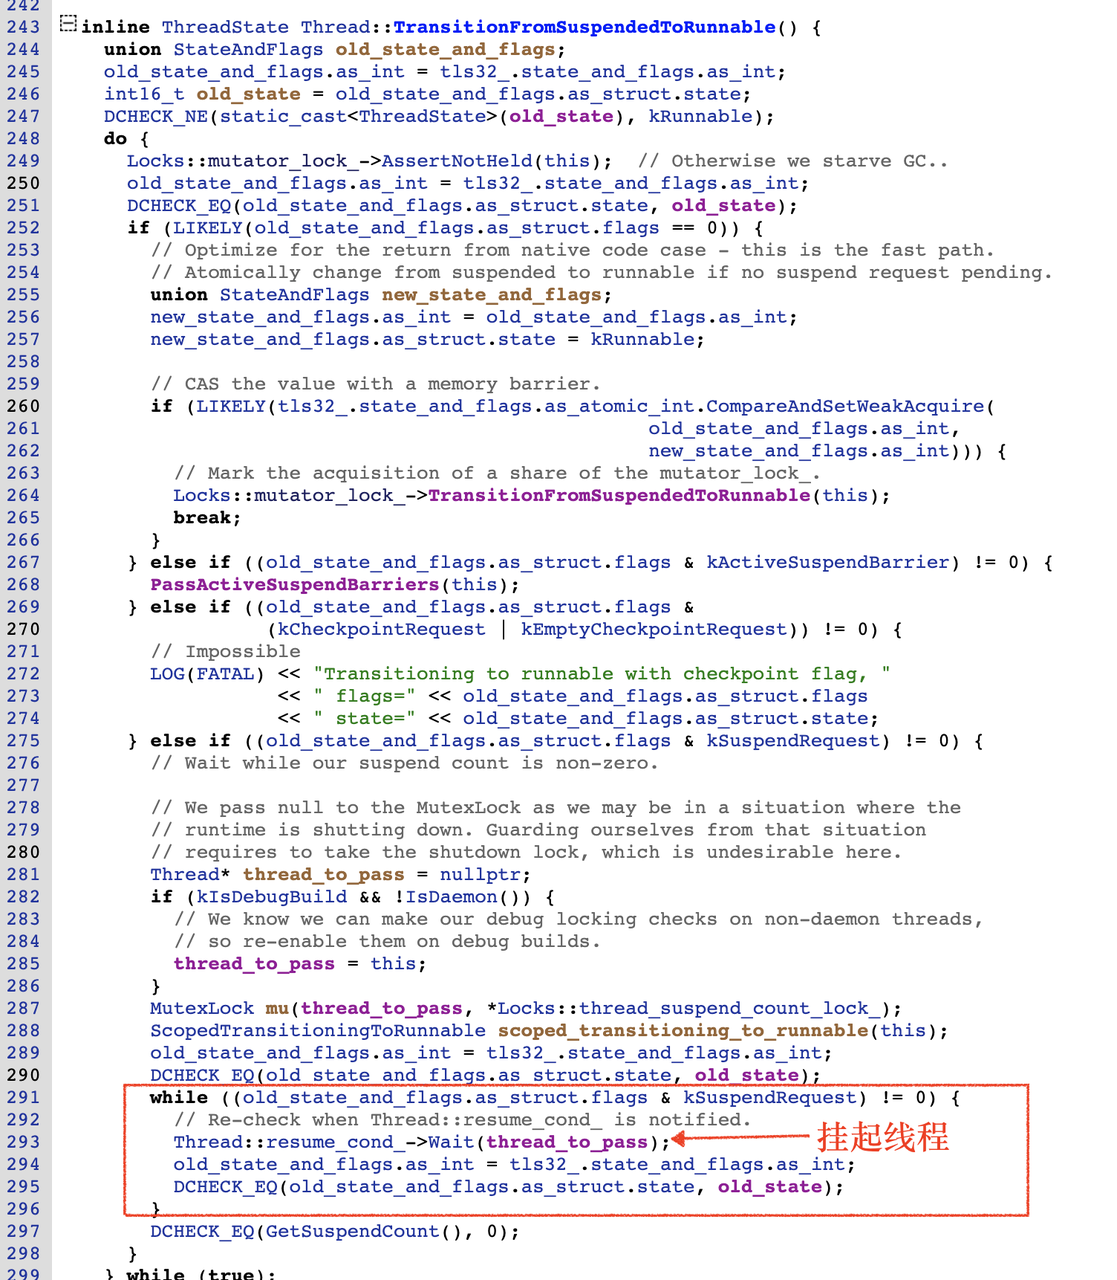
根据函数名可知,这个函数会将线程状态从kSuspended切换为kRunnable。这个流程里会判断state_and_flags里的flag是否设置了kSuspendRequest标志位,如果设置,则通过调用 Thread::resume_cond_->Wait(thread_to_pass)函数使线程进入等待状态,完成线程的挂起操作。
挂起结束恢复线程时,在while循环退出前调用了 Locks::mutator_lock_->TransitionFromSuspendedToRunnable(this),通过shared方式持有全局锁mutator_lock_,使得Runnable状态的线程持有了这个锁,线程继续执行。
TransitionFromSuspendedToRunnable函数看起来很复杂,其实里面很多内容只不过是因为用了无锁编程而引入的”套路“代码。
线程恢复
线程恢复的流程比较简单。
恢复线程需要调用thread_list.cc中的Resume()函数,代码如下:
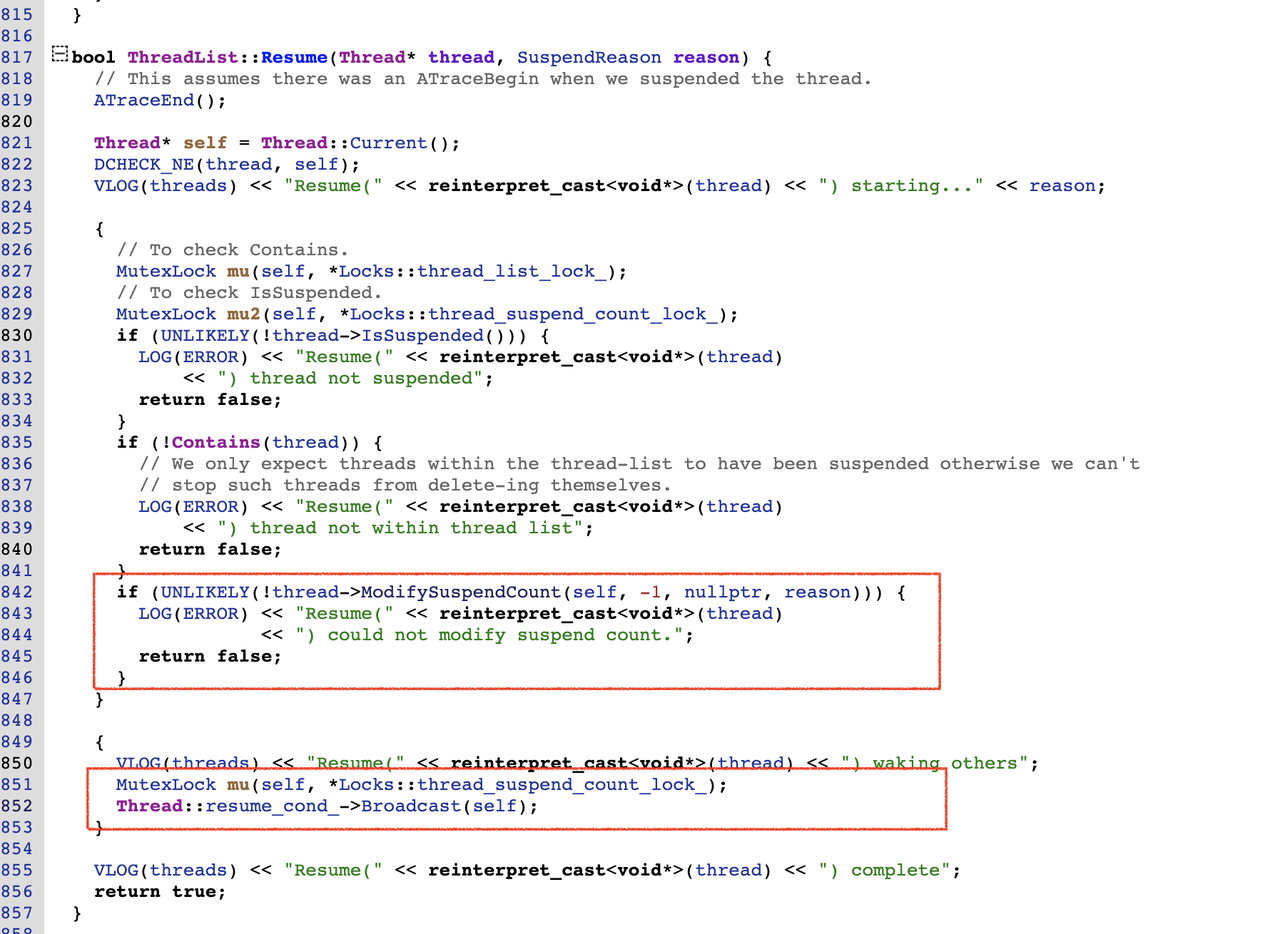
Resume函数中,先调用ModifySuspendCount将线程的suspend_count减1,然后再ModifySuspendCountInternal函数中,当线程的suspend_count等于0时,会清除线程state_and_flags的kSuspendRequest的标志位,清除挂起标志位后,调用Thread::resume_cond_->Broadcast()唤醒线程。
线程将从TransitionFromSuspendedToRunnable函数的Thread::resume_cond_->Wait()处被唤醒,开始继续原来的执行流程,并且线程的状态切换为kRunnable。
Wait 和 Broadcast 的实现原理
以上分析了线程挂起和恢复的流程,其中,
线程挂起调用的是Wait函数:
1 | Thread::resume_cond_->Wait(thread_to_pass) |
线程恢复调用的是Broadcast函数:
1 | Thread::resume_cond_->Broadcast(self) |
resume_cond_是类art::Thread中的静态成员变量,对应的类型是ConditionVariable:
1 | class Thread { |
类ConditionVariable中Wait()函数的实现为:
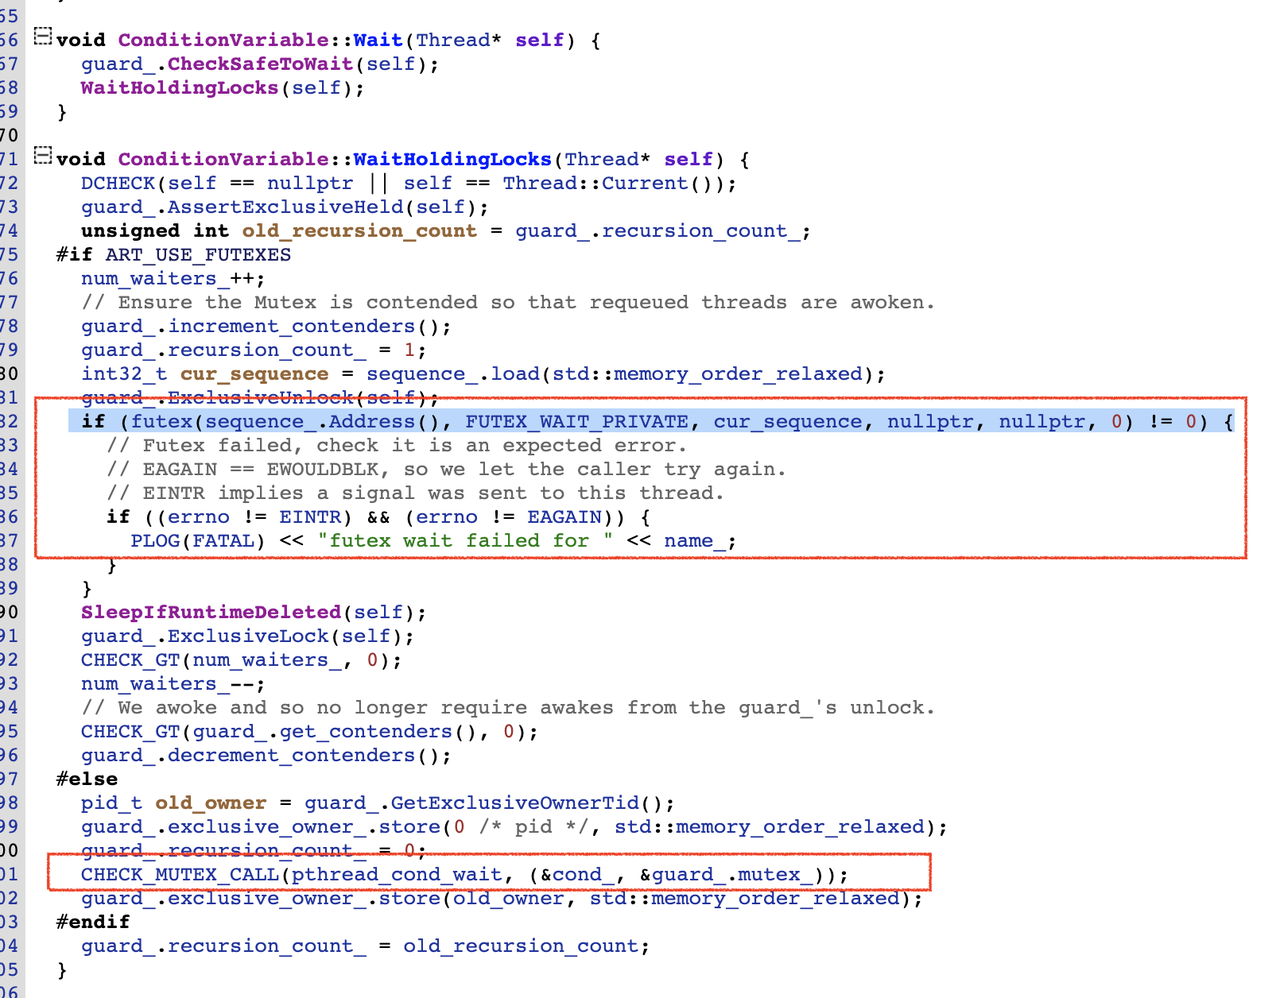
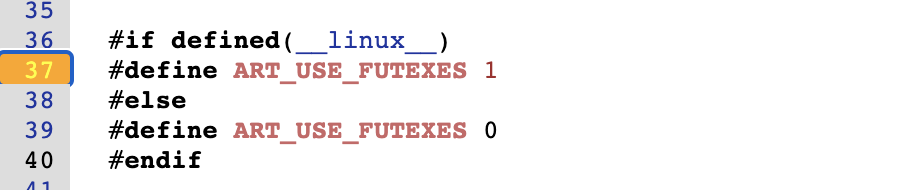
根据宏ART_USE_FUTUXES 来判断是使用futex系统调用挂起线程还是使用pthread_cond_wait来挂起。
显然,这里使用了futex,因为宏ART_USE_FUTUXES的定义如下:
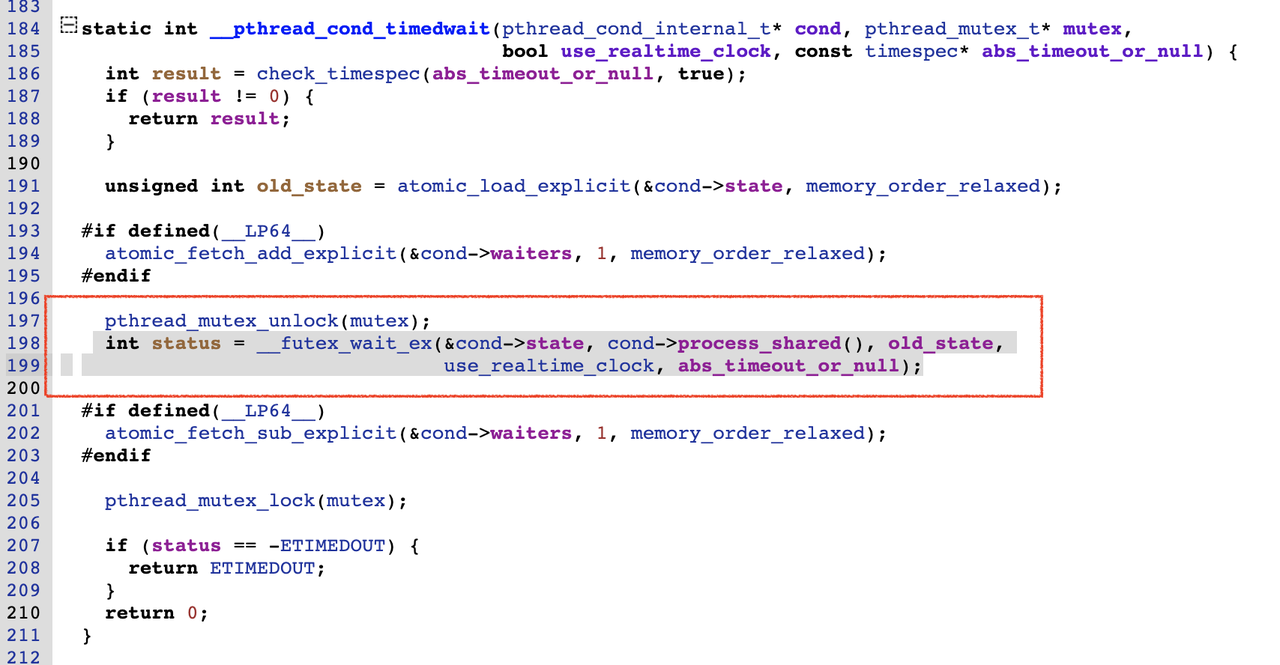
另外,在Android的bionic库中,pthread_cond_wait最终实现其实也是futex系统调用:
再看看线程恢复函数Broadcast的实现:
[art/runtime/base/mutex.cc]
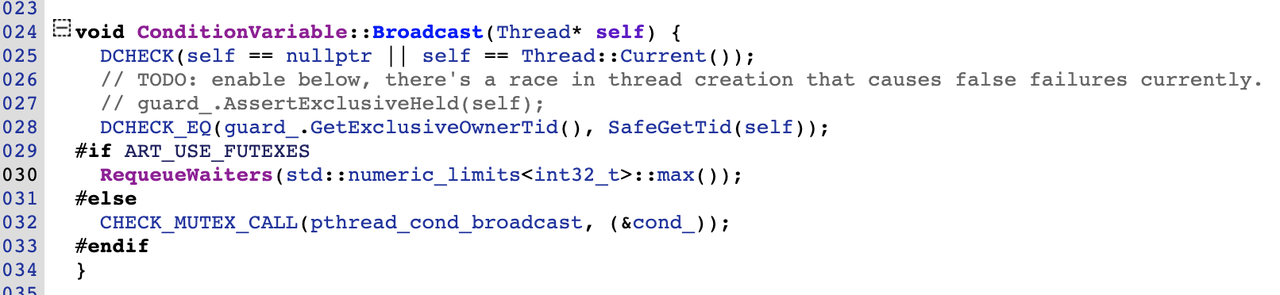
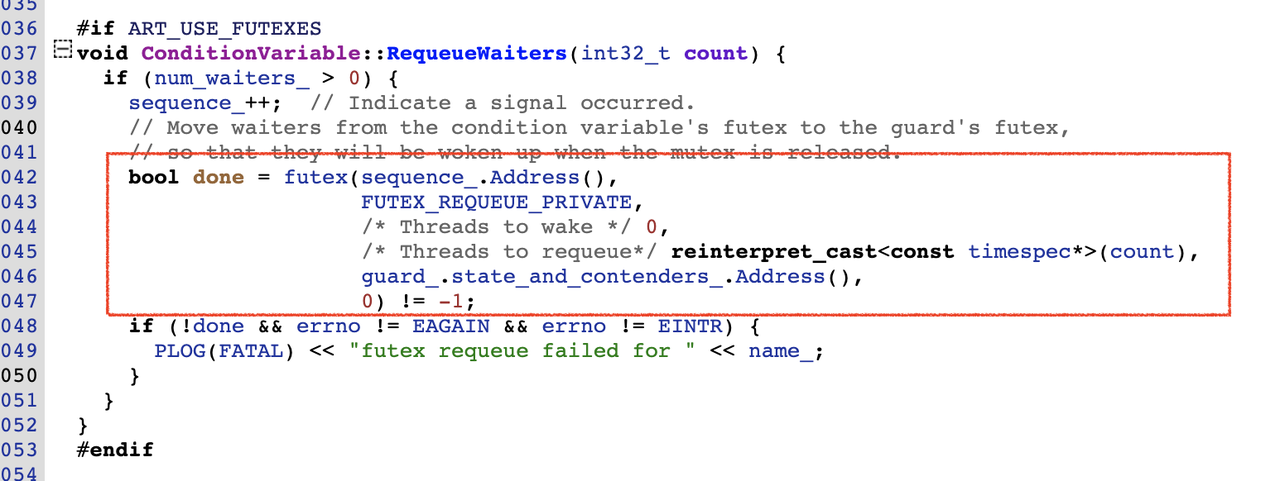
最终也是调用的futex函数实现的,跟挂起时相比,只是传入的flag不相同而已。
线程挂起时,调用futex传入flag:
FUTEX_WAIT_PRIVATE,实现线程等待;线程恢复时,调用futex传入flag:
FUTEX_REQUEUE_PRIVATE,实现线程唤醒;
这两个宏定义在futex.h头文件中:
1 | #define FUTEX_WAIT 0 // 等待 |
Futex是linux上一种用户态和内核态混合的同步机制,支持进程内的线程之间和进程间的同步锁操作。
futex原理可参考文档:linux–futex原理分析
至此,完成的线程挂起和恢复的流程分析。
SuspendAll和ResumeAll
SuspendAll用于暂停所有Java线程的执行,而ResumeAll用于恢复所有Java线程的执行。
下面分别介绍这两个函数的实现过程。
SuspendAll流程
SuspendAll函数最终调用到了SuspendAllInternal函数,这个函数的具体实现如下:
1 | void ThreadList::SuspendAllInternal(Thread* self, |
这个函数的核心逻辑包含三部分,分别是:
- 将需要挂起的线程数量设置到
pending_threads变量中,此变量起到栅栏作用,用于等待所有线程的挂起完成; - 遍历所有线程,调用针对每个线程调用
ModifySuspendCount函数,传入pending_threads的地址,将线程的suspend_cout加1,设置kSuspendRequest标志,并且设置kActiveSuspendBarrier标志(表示此次挂起需要等待栅栏); - 等待所有线程挂起完成,方法是在循环语句中检测
pending_threads值是否为0,不为0则通过futex系统调用继续等待,直到等于0,则所有线程挂起成功,完成SuspendAll的流程;
SuspendAllInternal函数跟Suspend单个线程的核心不同点是SuspendBarrier的栅栏处理流程。
挂起多个线程,需要使用栅栏等待所有线程完成挂起,挂起完成后通知到调用侧。
每个线程执行到Check Point后完成本线程的挂起,同时也要处理栅栏。此时,会调用art::Thread的PassActiveSuspendBarriers函数。PassActiveSuspendBarriers源码如下:
1 | bool Thread::PassActiveSuspendBarriers(Thread* self) { |
这个函数其实很简单,主要包含两个逻辑:
- 将调用SuspendAllInternal时传入本线程的计数器
pending_threads指针变量的值减1; - 当
pending_threads减小到0时,调用futex FUTEX_WAKE_PRIVATE,唤醒调用SuspendAllInternal的线程,通知它所有线程已完成挂起;
ResumeAll流程
ResumeAll用于恢复所有暂停线程,使其继续执行。
由于这里并不用等待暂停线程的状态变更,所以实现非常简单,跟恢复单个线程执行的流程基本一致。
核心逻辑就两条:
- thread->ModifySuspendCount:将所有线程的
suspend_count减1,如果suspend_count等于0,则清除线程state_and_flags的kSuspendRequest的标志; - Thread::resume_cond_->Broadcast:通知所有线程,如果线程的
state_and_flags的kSuspendRequest的标志被清除就立即恢复执行;
源码如下:
art/runtime/thread_list.cc
1 | void ThreadList::ResumeAll() { |
执行CheckPoint闭包任务
在上面CheckSuspend()函数的分析中,如果线程的state_and_flag变量设置了kCheckpointRequest标志位,则会调用RunCheckpointFunction()函数,执行检查点任务。
下面详细分析此流程。
执行Closure任务流程
RunCheckpointFunction函数的代码如下:art/runtime/thread.cc
1 | Closure* checkpoint_function GUARDED_BY(Locks::thread_suspend_count_lock_); |
这个函数的实现并不复杂,主要包含两点:
- 保存线程成员变量
checkpoint_function到checkpoint指针中,并执行这个Closure任务; - 将线程成员变量
checkpoint_overflow_这个list中的头部元素取出保存到checkpoint_function中,下次继续执行这个Closure任务,如果list中任务已经消费完,则清除线程的kCheckpointRequest标志;
其中,
线程的checkpoint_function变量:保存了当前需要执行的Closure任务
线程的list变量checkpoint_overflow_:保存了下次需要执行的所有Closure任务。
这里,Closure是一个非常简单的纯虚类,内部仅包含一个析构函数和一个虚函数Run(),有点类似于Java的Runnable接口:
1 | class Closure { |
设置Closure任务
下面看看如何设置Closure任务。
thread.cc中有两个可设置Closure任务的函数:RequestSynchronousCheckpoint和RequestCheckpoint。
前者是同步的,也就是设置后,当前线程会等待目标线程Closure任务执行完成。
后者是异步的,只给线程设置Closure任务,不关心执行完成的时间。
这里介绍下RequestCheckpoint的实现。
其源码如下:art/runtime/thread.cc
1 | bool Thread::RequestCheckpoint(Closure* function) { |
这个函数的要点有:
- 线程的状态如果非
kRunnable,则无法设置Closure任务,返回false; - 给线程设置
kCheckpointRequest的标志位; - 如果线程的
checkpoint_function为空,则将任务保存到里面,如果非空,则保存到这个list中checkpoint_overflow_;
所有线程执行Closure任务
在thread_list.cc中,还有一个函数可以设置所有线程执行某个Closure任务:RunCheckpoint。
RunCheckpoint函数的要点有:
- 遍历所有Java线程,针对每个线程调用
RequestCheckpoint函数,设置线程的Closure任务; - 如果线程是非
kRunnable状态,RequestCheckpoint会设置任务失败,此时会调用ModifySuspendCount函数尝试挂起线程,并轮训等待线程挂起完成,挂起成功后将线程指针保存到suspended_count_modified_threads这个vector中; - 遍历保存了挂起线程的vector:
suspended_count_modified_threads,在本线程执行Closure任务,然后恢复线程的执行。
代码如下:
1 | size_t ThreadList::RunCheckpoint(Closure* checkpoint_function, Closure* callback) { |
通过RunCheckpoint可知,它会要求所有线程都执行指定的Closure任务,假如某些线程非Runnable状态(比如kSuspend状态),无法执行Closure任务,则由调用者来代替这些线程执行Closure任务,即是在调用者线程里直接调用Run函数,并传入真正的目标线程对象。
哪些情况下会用到这种强操作呢?
比如,应用程序的某些重要线程阻塞了,但我们又需要打印所有线程的调用栈信息以协助排查问题。显然,让阻塞的线程从阻塞处退出并进入CheckPoint点以执行打印调用栈是不现实的。此时,RunCheckpoint的这种处理方式就派上用场了。
源码中Check Point闭包使用案例
打印线程调用堆栈:DumpCheckPoint
当App发生ANR时,会发送一个SIGQUIT信号,在信号处理器SignalCatcher中,监听到SIGQUIT后,调用了signal_catcher的HandleSigQuit()函数,代码如下:

在HandleSigQuit函数中,调用了runtime的DumpForSigQuit函数

在Runtime的DumpForSigQuit函数中,调用了thread_list.cc中的DumpForSigQuit函数,打印所有线程的调用堆栈,包括Java线程和native线程:
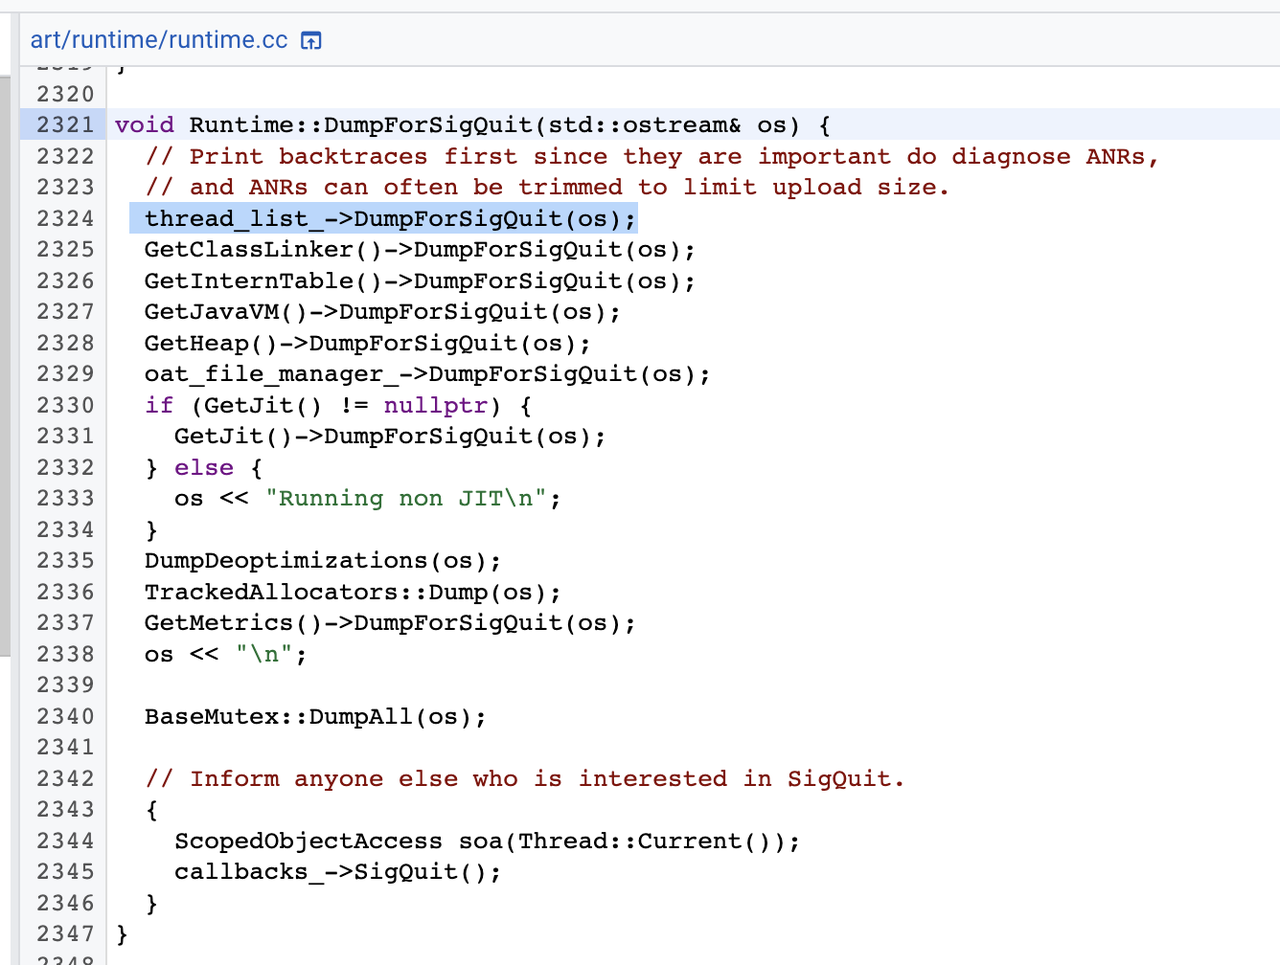
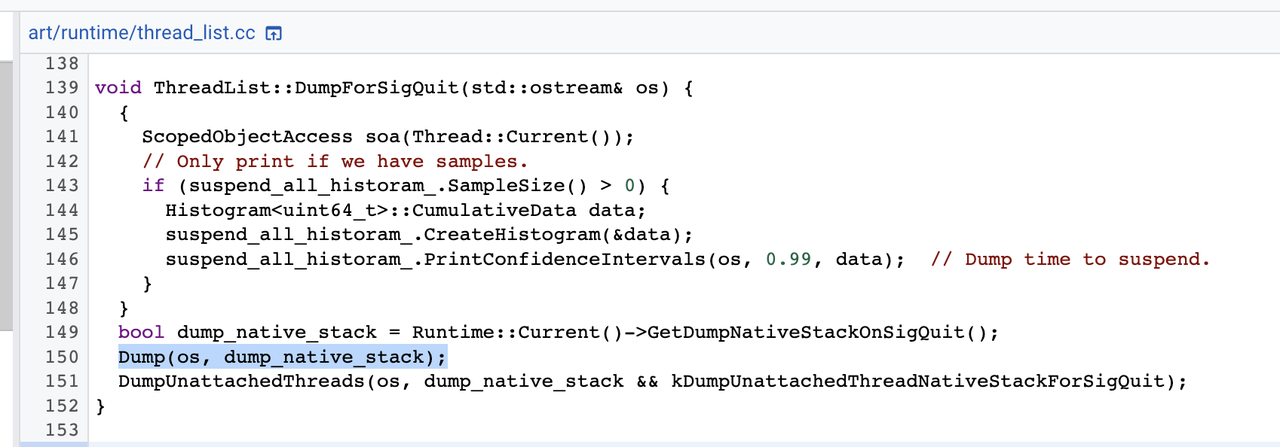
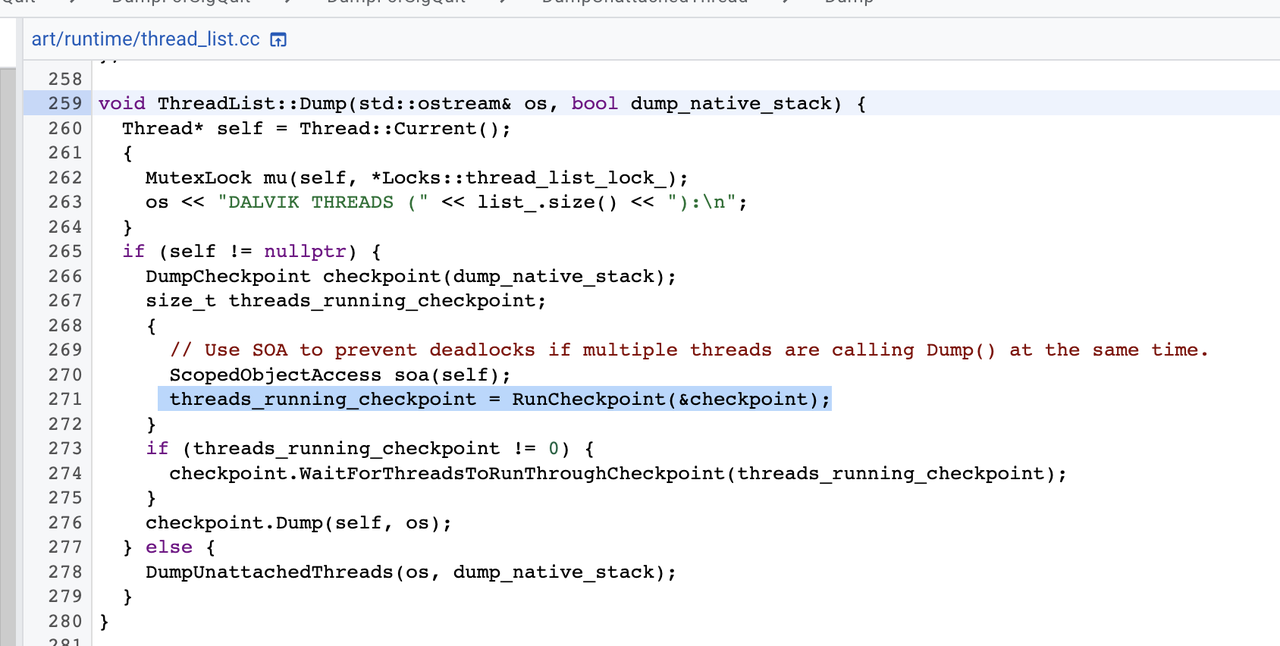
DumpForSigQuit函数最终调用了thread_list.cc中的Dump函数打印线程堆栈,Dump函数中,构造了一个DumpCheckPoint类型的闭包任务,然后调用RunCheckPoint函数,通知所有Java线程执行这个闭包任务(挂起的线程在当前线程中执行闭包),代码如下:
上面已经介绍RunCheckPoint函数的执行流程,这里重点介绍下thread_list.cc中的DumpCheckPoint这个类的具体实现。
DumpCheckpoint继承了纯虚类Closure,实现了虚函数Run函数,在Run函数中调用Thread的Dump函数输出当前线程的调用堆栈。
DumpCheckpoint类中,比较难理解的点是成员变量barrier_以及函数WaitForThreadsToRunThroughCheckpoint。这里重点介绍下。
Barrier这个词的本意是栅栏,在ART虚拟机中,它是当做多线程同步计数器来使用。比如,有6个线程,其中一个线程需要等待其他5个线程执行完某个任务才能返回,这种情形下,就可以使用Barrier来实现。
具体用法如下:
- 创建一个
Barrier对象,设置初始值为5,并将这个对象传递给另外5个线程; - 这5个线程执行完任务后,调用
Barrier的Pass函数,该函数会将Barrier的计数器减1; - 第6个线程将等待着这个
Barrier对象,直到其计数器变成0;
在thread_list.cc的Dump函数中,调用了RunCheckPoint,根据上面的分析,这个函数会返回需要执行check point任务的线程数量,然后将这个数量传给WaitForThreadsToRunThroughCheckpoint函数,将barrier_的计数器加上线程的数量,并等待barrier_计数器减少到0。
而在DumpCheckpoint的Run函数中,执行完后会将barrier_的计数器减去1,变成0后,说明所有线程的DumpCheckpoint都执行完,WaitForThreadsToRunThroughCheckpoint函数从barrier_.Increment处开始恢复执行,代码如下:
1 | // A closure used by Thread::Dump. |
这里使用Barrier的原因是,在RunCheckPoint函数中,如果线程是kRunnable状态,则会将check point任务丢到该线程的check point点处,在本线程中执行。因此,需要Dump线程等待其他线程执行完check point任务。
Jit垃圾回收:MarkCodeClosure
在JIT流程中,有一个类JitCodeCache,它提供了一个存储空间,用于存放JIT编译的结果。当编译结果超过一定的阈值时(大约是64M),该部分空间会被释放,也就是JIT的GC过程。
对于JIT的GC而言,使用的算是Mark-Sweep,即标记清除法。
标记时,需要判断所有线程的正在执行的方法栈是否有使用到JIT编译的机器码,如果有,则标记这些方法对应的code cache,清除时忽略这些方法对应的机器码。
JIT GC的标记对应的函数是jit_code_cache.cc中的 MarkCompiledCodeOnThreadStacks,这个函数具体实现如下:
1 | void JitCodeCache::MarkCompiledCodeOnThreadStacks(Thread* self) { |
这里的代码逻辑跟ThreadList::Dump()中使用DumpCheckPoint的流程基本一致,先是构造一个Check point的Closure类,然后调用ThreadList的RunCheckpoint函数让所有线程执行这个Closure,最后,通过barrier等待每个线程的Closure执行完成。
在MarkCodeClosure的Run函数中,通过StackVisitor遍历线程的当前调用栈,如果有quick_code,则判断quick_code是否在jit_code_cache中,如果在,则在CodeCacheBitmap中标记当前quick_code的地址。在JIT的GC的清除阶段,就不清除对应的机器码。
代码如下:
1 | class MarkCodeClosure final : public Closure { |
检查点(CheckPPoint)的插入流程
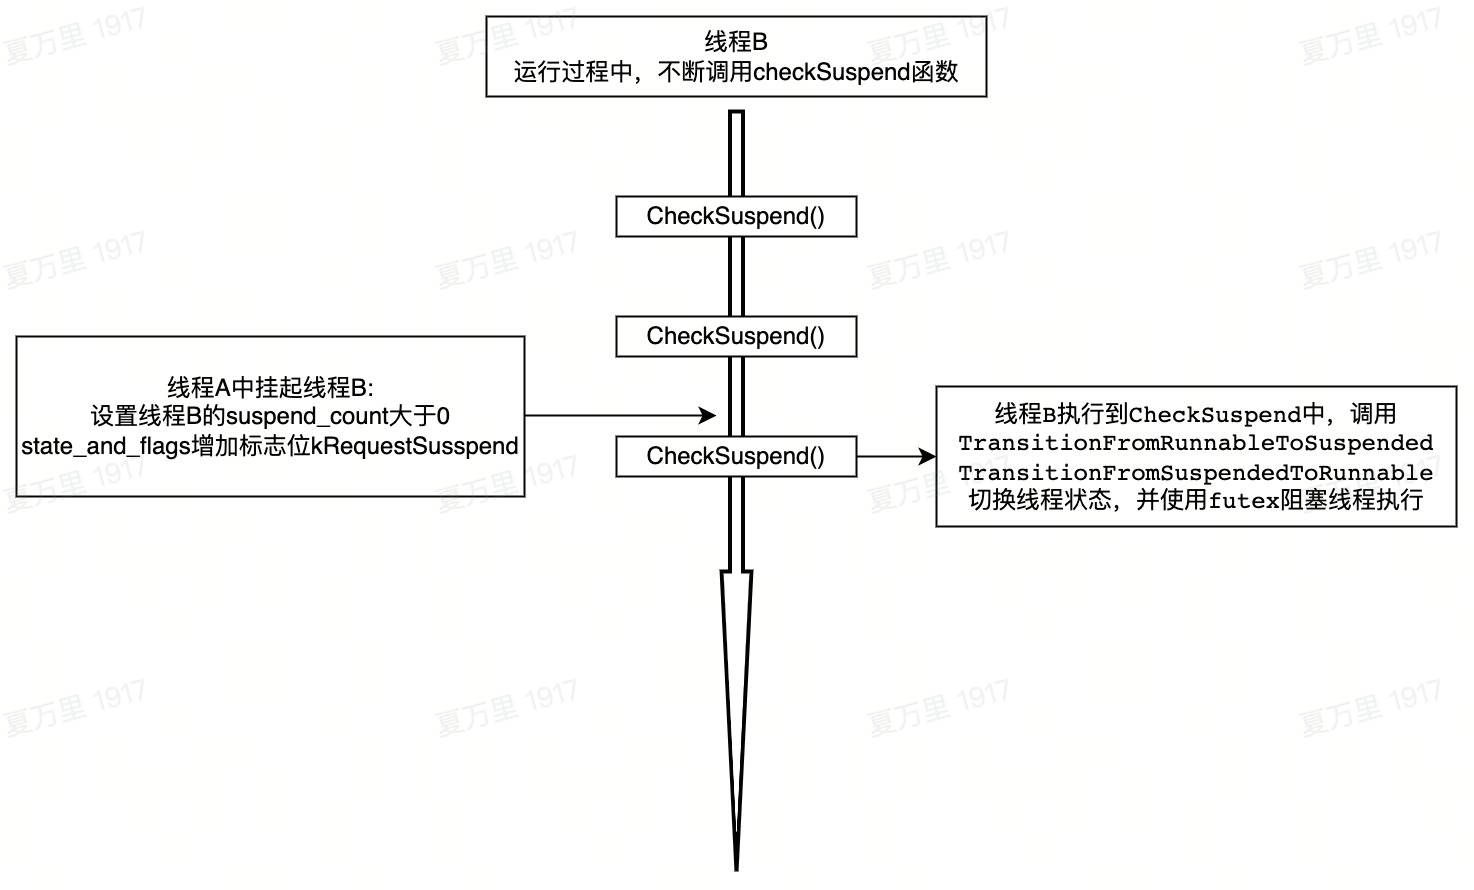
上面分析了挂起函数的实现,当主动触发线程挂起时,并没有直接让线程暂停执行,而仅仅是将线程的state_and_flags设置了kSuspendRequest标志位,最终是在Thread::CheckSuspend()函数中执行的线程挂起操作。
那么Thread::CheckSuspend()函数又是在何时何处被调用的呢?
答案是,在Check Point(检查点)中被执行的。在Java代码正常执行的过程中,会插入一些检查点,当代码执行到检查点时,会挂起当前线程,而执行其他任务,这些其他任务包括:垃圾回收、Debug、获取调用栈等等。
在ART虚拟机中,检查点存在下面几个位置(解释执行和机器码执行略有区别):
- 方法结束时
- 条件语句分支
- for\while 循环一次结束的出口
- 抛出异常的地方
下面分别分析解释执行和机器码执行流程中,检查点是如何被插入的。
解释执行
先看看解释执行中的检查点。
[art/runtime/interpreter/interpreter_switch_impl-inl.h]
异常处理流程中的检查点:
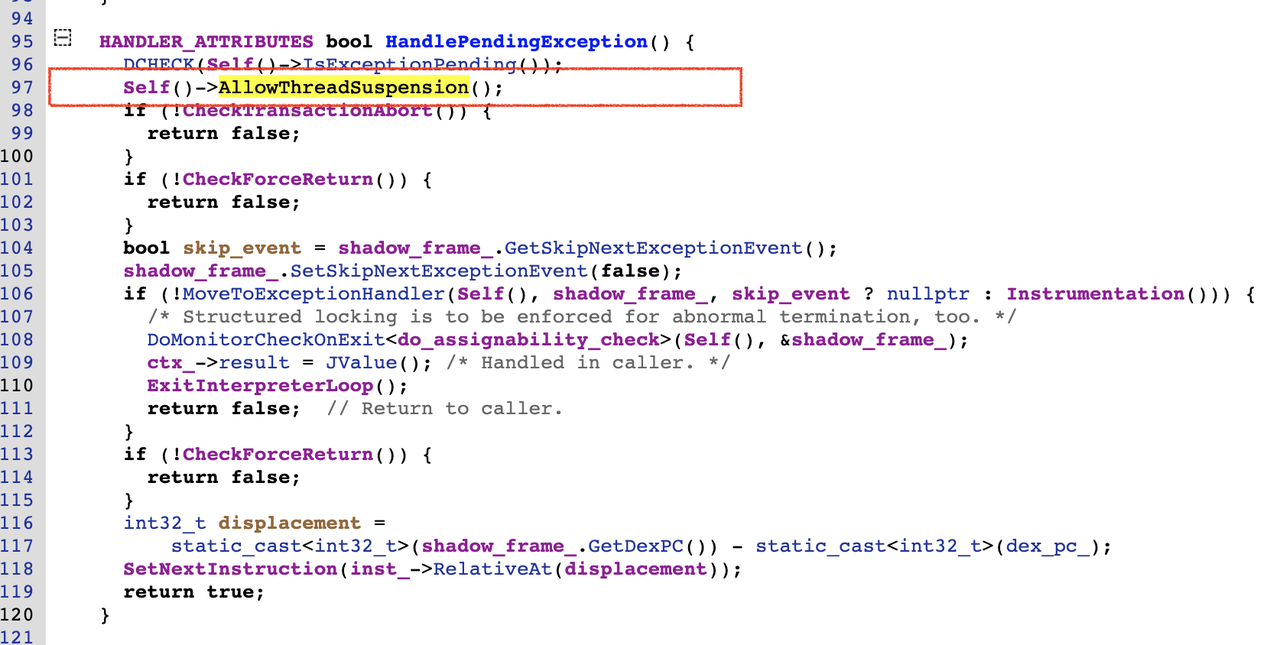
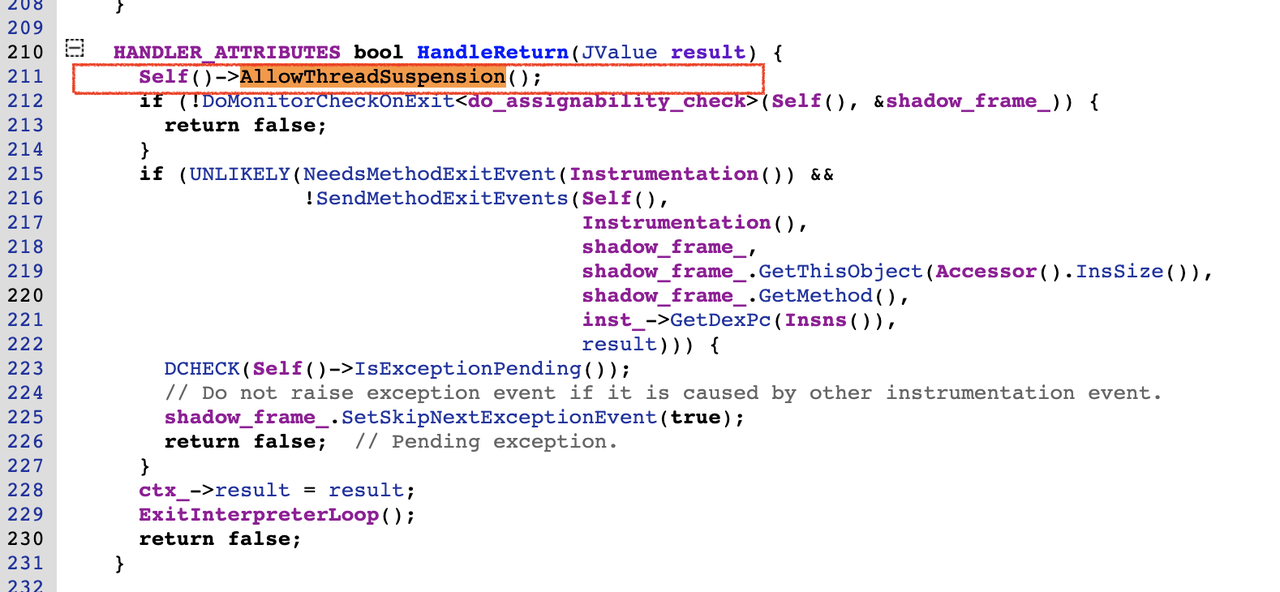
方法返回流程中的检查点:
Goto, switch等跳转中的检查点:

其中 Self()->AllowThreadSuspension() 就是挂起线程的检查点,它最终会执行到 Thread::CheckSuspend() 中,这里的 Self() 就是当前的Thread指针,代码如下:
1 | inline void Thread::AllowThreadSuspension() { |
可以看到,最终调到了CheckSuspend函数。
机器码执行
字节指令的机器码是在dex2oat或者jit流程中编译生成的,在编译器生成quick code时,会在生成代码的各个流程中插入调用CheckSuspend函数的指令。
生成机器码流程
这里以arm64位指令生成过程为例,介绍机器码生成过程中,是如何插入CheckSuspend函数的相关指令。
机器码中的检查点跟解释执行模式稍有不同,主要安装在以下位置:
- 函数入口设置一个检查点;
- 循环头(Loop Handler)设置一个检查点;
- HGoTo IR处理中,如果存在往回跳转的情况,也会设置一个检查点;
具体来说,构造IR时,在HInstructionBuilder的Build函数中,在以下两处添加SuspendCheck的IR:
- Entry Block中设置一个检查点,其中
HSuspendCheck是用于生成检查点机器码对应的IR; - Loop Header Block中设置一个
HSuspendCheck;
代码如下:
art/compiler/optimizing/instruction_builder.cc
1 | bool HInstructionBuilder::Build() { |
最终生成机器码时,在CodeGenerator中,会针对HSuspendCheck和HGoTo IR生成与检查点相关的机器码,代码如下:
art/compiler/optimizing/code_generator_arm64.cc
1 | void InstructionCodeGeneratorARM64::VisitSuspendCheck(HSuspendCheck* instruction) { |
在HGoTo IR中,也有HSuspendCheck的处理流程,这里针对循环回跳和Entry Block分别设置了检查点:
art/compiler/optimizing/code_generator_arm64.cc
1 | void InstructionCodeGeneratorARM64::VisitGoto(HGoto* got) { |
再看看GenerateSuspendCheck()函数中生成SuspendCheck函数调用对应的指令的步骤,主要包括三个步骤:
- 创建一个
SuspendCheckSlowPathARM64对象; - 根据线程的
state_and_flag成员变量的偏移,并生成ldhr指令; - 生成cbnz或者cnd指令;
art/compiler/optimizing/code_generator_arm64.cc
1 | void InstructionCodeGeneratorARM64::GenerateSuspendCheck(HSuspendCheck* instruction, |
再看看SuspendCheckSlowPathARM64这个类,检查点对应的机器码在这个类的EmitNativeCode函数生成:
1 | class SuspendCheckSlowPathARM64 : public SlowPathCodeARM64 { |
kQuickTestSuspend定义在QuickEntrypointEnum这个枚举类中,这里使用了两层#define宏定义包裹:
art/runtime/entrypoints/quick/quick_entrypoints_enum.h
1 | // Define an enum for the entrypoints. Names are prepended a 'kQuick'. |
kQuickTestSuspend对应的函数的声明在QuickEntryPoints结构体中,对应的函数名称是pTestSuspend,这里的QuickEntryPoints结构体,在thread.h中也被使用到:
1 | class Thread { |
art/runtime/entrypoints/quick/quick_entrypoints.h
1 | // Pointers to functions that are called by quick compiler generated code via thread-local storage. |
以上两处,共同使用QUICK_ENTRYPOINT_LIST的宏定义:
art/runtime/entrypoints/quick/quick_entrypoints_list.h
1 | // All quick entrypoints. Format is name, return type, argument types. |
pTestSuspend函数在线程初始化时设置为art_quick_test_suspend函数的地址,进而调用到SuspendCheck函数,下文具体分析这个流程。
生成机器码结果
这里以一个非常简单的java方法为例,使用下面的命令编译出release apk的odex文件:
adb shell cmd package compile -m speed -f my-package
分析其编译后的机器码中的指令(Android10):
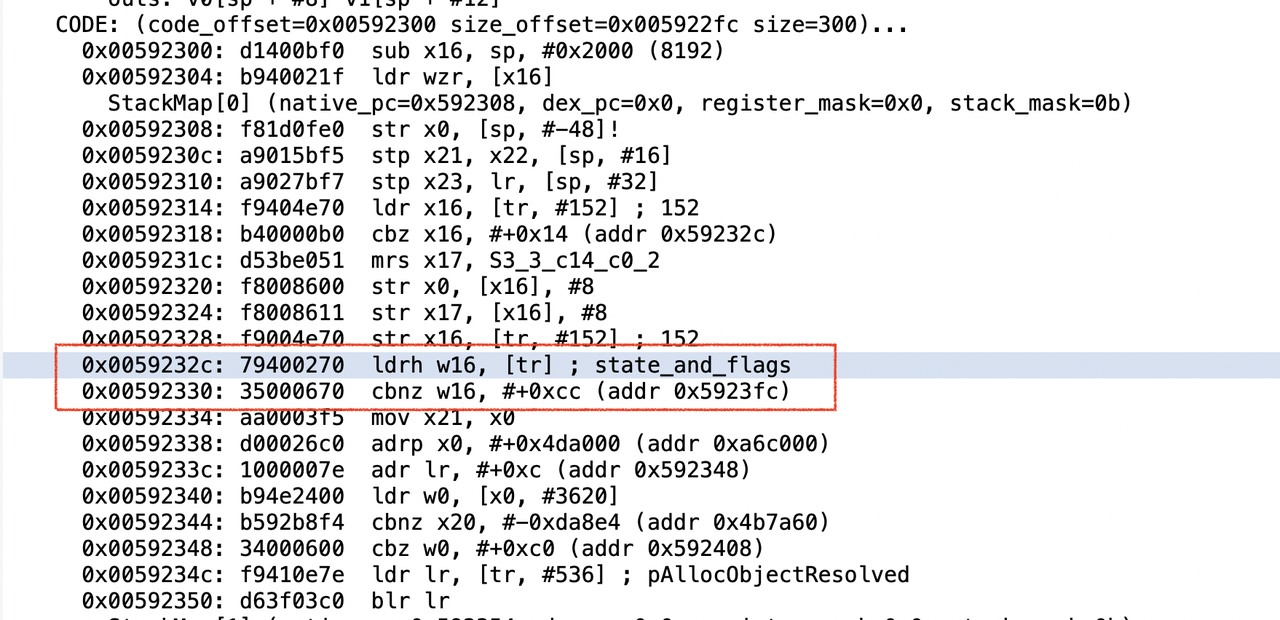
方法开头的一些指令是进行栈溢出检测,开辟栈空间以及保存寄存的操作。
看红框中的指令,读取了x19寄存器(tr)中的值到w16寄存器中,x19寄存器中保存的是当前线程的地址,thread指针偏移为0出的成员变量刚好就是thread的state_and_flags,从源码中可以看出:
红框中这两条指令:
0x0059232c: 79400270 ldrh w16, [tr] ; state_and_flags
0x00592330: 35000670 cbnz w16, #+0xcc (addr 0x5923fc)
意思就是,当前线程的state_and_flags的值不为0,就跳转到地址0x5923fc执行。
地址0x5923fc处的指令如下:
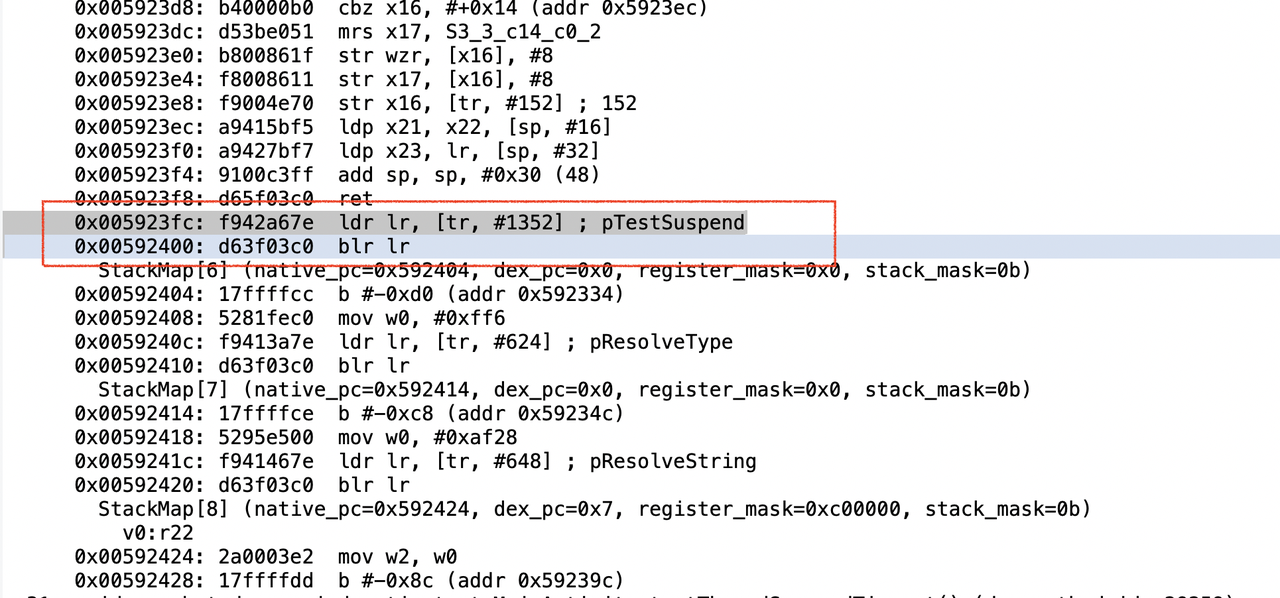
红框中的指令,读取x19寄存器中地址偏移1352处的内容到lr寄存器中,然后跳转到这个地址中执行。
x19寄存器保存的是当前线程的地址,当前线程偏移1352处刚好就是当前线程pTestSuspend成员变量。(PS: 在Android12及以上版本编译后的机器码中,此处已改成直接跳转到目标函数。)
线程的pTestSuspend成员变量的赋值是在线程初始化的流程中进行的:


在线程的初始化流程中的注册了EntryPoints,pTestSuspend这个成员变量设置了函数art_quick_test_suspend的地址,这是一个纯汇编实现的函数,arm64中实现如下:
[art/runtime/arch/arm64/quick_entrypoints_arm64.S]

直接跳转到了函数artTestSuspendFromCode中:
[art/runtime/entrypoints/quick/quick_thread_entrypoints.cc]

最终也是执行了线程的CheckSuspend()函数。
另外,在jni函数的调用结束时,也加入了检查点。
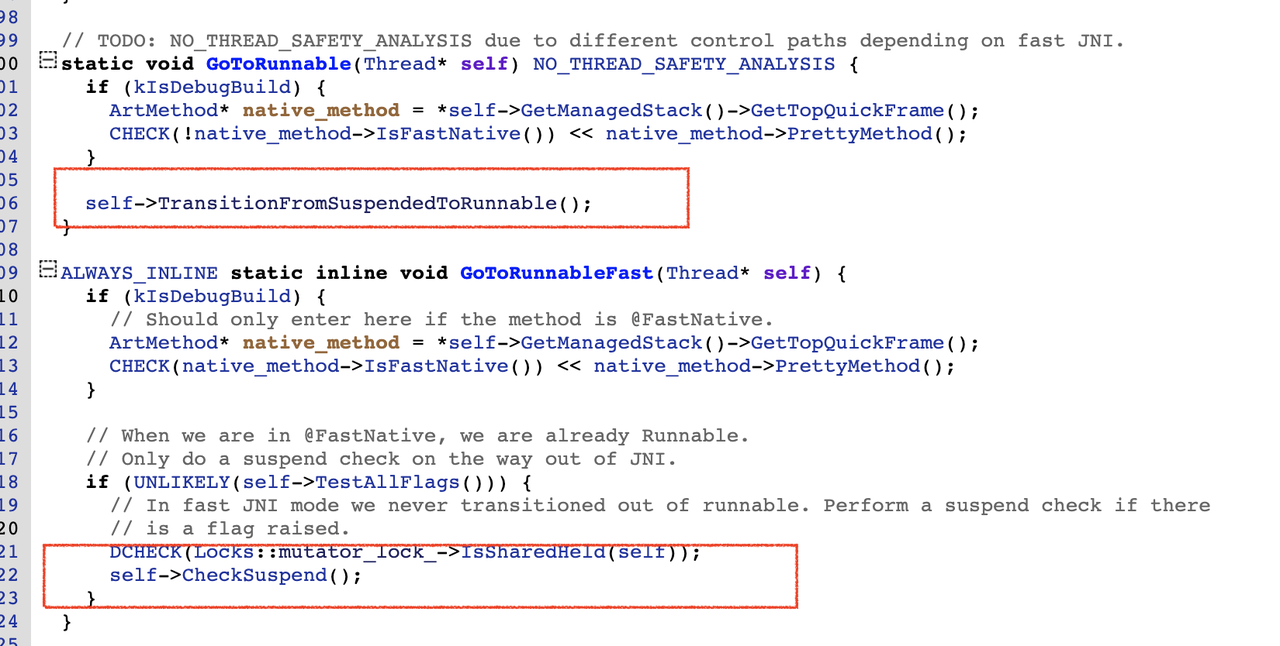
普通的jni方法调用时,会将线程状态切换到kNative,执行完成切换回kRunnable,因此这个流程不需要检查点。
但FastNative注解的jni方法,由于不会切换线程状态,因此,方法执行完成,会调用一次CheckSuspend()。
至此,总结完解释执行和机器码执行中的checkPoint点的设置流程。
线程CheckPoint机制流程图
线程CheckPoint机制的整体流程图如下:
总结
ART虚拟机的Check Point机制主要为了实现两个功能:
- 线程运行时执行Check Point闭包任务;
- 挂起和恢复线程的执行;
虚拟机为了实现这两个功能,在Java线程对应的Native类中添加了state_and_flag变量,通过设置kSuspendRequest或者kCheckpointRequest来通知线程需要执行挂起任务还是闭包任务。具体执行任务的时机是在CheckSuspend函数中,这函数(检查点)被插入到了解释执行和机器码执行的多个流程中,这样,Runnable状态的线程就能快速执行到检查点,完成线程挂起或者执行闭包任务。
参考
- Android Source Code
- 《深入理解Android Java虚拟机ART》邓凡平 著